While there are many benefits of Infrastructure as Code, a few key benefits include the simplification of cloud adoption, allowing us to quickly adopt cloud-based services and offerings to improve our capabilities. Infrastructure as Code allows us to remove many of the manual steps required today for infrastructure requests, giving us the ability to automate approved requests without worrying about tickets sitting in a queue. We can also use Infrastructure as Code to provide capacity on-demand by offering a library of services for our developers, even publishing a self-service capability where developers and application owners can be empowered to request and provision infrastructure that better matches their requirements. Again, all of this is possible while driving standardization and consistency throughout the organization, which can drive efficiencies and reduce errors or deviations from established norms.
References
Infrastructure as Code in a Private or Public Cloud
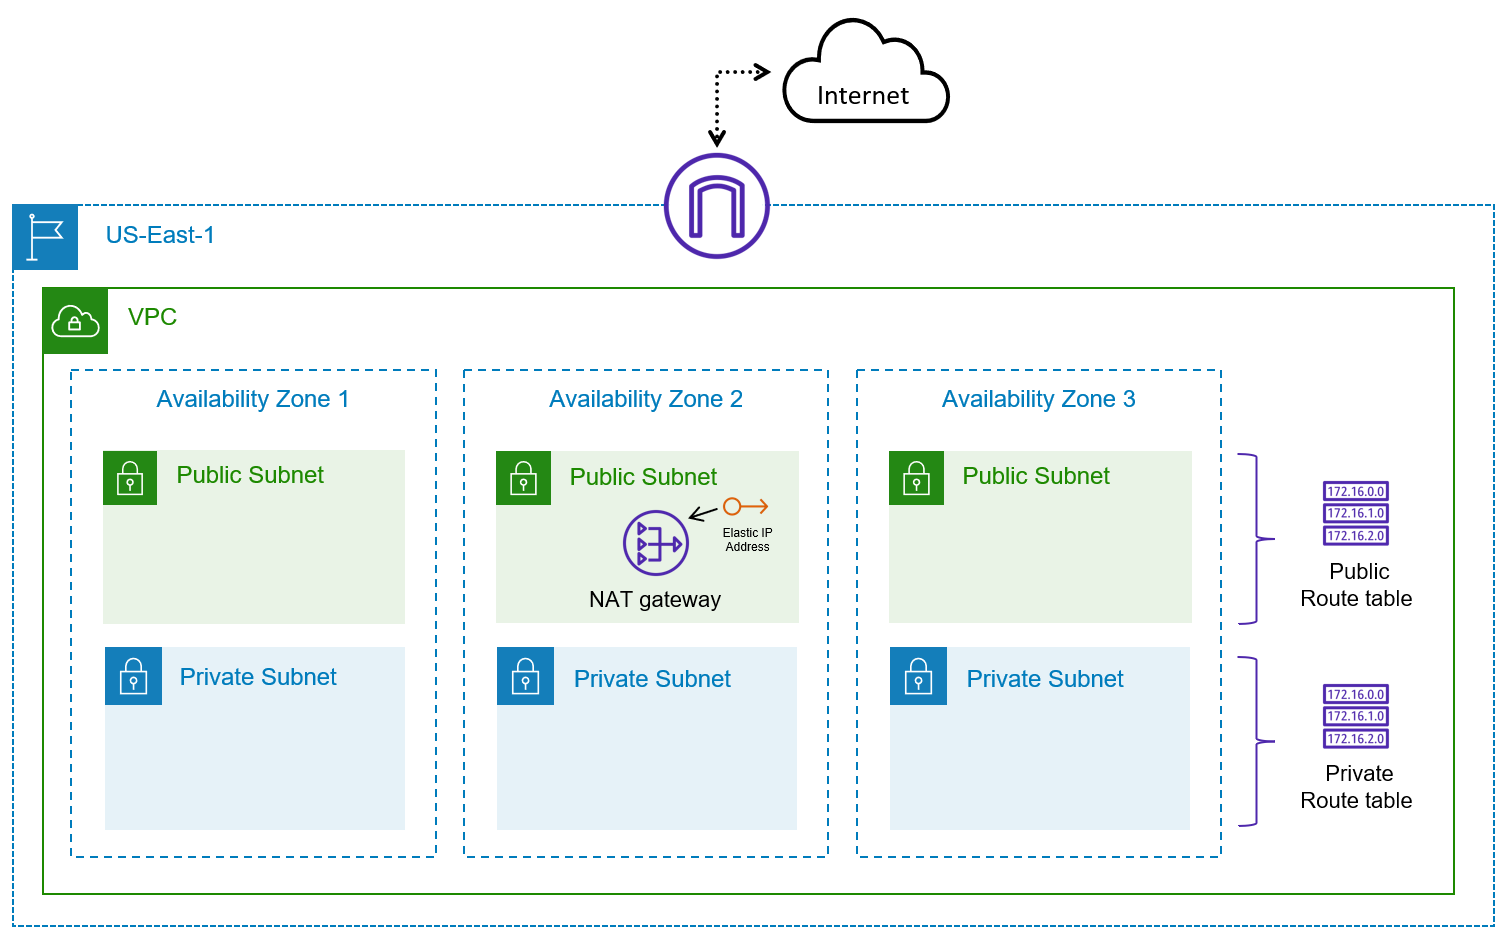
You have been tasked with deploying some basic infrastructure on AWS to host a proof of concept environment. The architecture needs to include both public and private subnets and span multiple Availability Zones to test failover and disaster recovery scenarios. You expect to host Internet-facing applications. Additionally, you have other applications that need to access the Internet to retrieve security and operating system updates.
- Task 1: Prepare files and credentials for using Terraform to deploy cloud resources
- Task 2: Set credentials for Terraform deployment
- Task 3: Deploy the AWS infrastructure using Terraform
- Task 4: Delete the AWS resources using Terraform to clean up our AWS environment
The end state of the AWS environment should look similar to the following diagram:
On your workstation, navigate to the /workstation/terraform directory. This is where we'll do all of our work for this training. Create a new file called main.tf and variables.tf.
In the variables.tf, copy the following variable definitions and save the file. Don't worry about understanding everything just yet, we'll learn all about variables in Objective 3.
variable "aws_region" {
  type    = string
  default = "us-east-1"
}

variable "vpc_name" {
  type    = string
  default = "demo_vpc"
}

variable "vpc_cidr" {
  type    = string
  default = "10.0.0.0/16"
}

variable "private_subnets" {
  default = {
    "private_subnet_1" = 1
    "private_subnet_2" = 2
    "private_subnet_3" = 3
  }
}

variable "public_subnets" {
  default = {
    "public_subnet_1" = 1
    "public_subnet_2" = 2
    "public_subnet_3" = 3
  }
}
In the main.tf file, copy the following Terraform configuration and save the file.
# Configure the AWS Provider
provider "aws" {
  region = "us-east-1"
}

#Retrieve the list of AZs in the current AWS region
data "aws_availability_zones" "available" {}
data "aws_region" "current" {}

#Define the VPC
resource "aws_vpc" "vpc" {
  cidr_block = var.vpc_cidr

  tags = {
    Name        = var.vpc_name
    Environment = "demo_environment"
    Terraform   = "true"
  }
}

#Deploy the private subnets
resource "aws_subnet" "private_subnets" {
  for_each          = var.private_subnets
  vpc_id            = aws_vpc.vpc.id
  cidr_block        = cidrsubnet(var.vpc_cidr, 8, each.value)
  availability_zone = tolist(data.aws_availability_zones.available.names)[each.value]

  tags = {
    Name      = each.key
    Terraform = "true"
  }
}

#Deploy the public subnets
resource "aws_subnet" "public_subnets" {
  for_each                = var.public_subnets
  vpc_id                  = aws_vpc.vpc.id
  cidr_block              = cidrsubnet(var.vpc_cidr, 8, each.value + 100)
  availability_zone       = tolist(data.aws_availability_zones.available.names)[each.value]
  map_public_ip_on_launch = true

  tags = {
    Name      = each.key
    Terraform = "true"
  }
}

#Create route tables for public and private subnets
resource "aws_route_table" "public_route_table" {
  vpc_id = aws_vpc.vpc.id

  route {
    cidr_block     = "0.0.0.0/0"
    gateway_id     = aws_internet_gateway.internet_gateway.id
    #nat_gateway_id = aws_nat_gateway.nat_gateway.id
  }
  tags = {
    Name      = "demo_public_rtb"
    Terraform = "true"
  }
}

resource "aws_route_table" "private_route_table" {
  vpc_id = aws_vpc.vpc.id

  route {
    cidr_block     = "0.0.0.0/0"
    # gateway_id     = aws_internet_gateway.internet_gateway.id
    nat_gateway_id = aws_nat_gateway.nat_gateway.id
  }
  tags = {
    Name      = "demo_private_rtb"
    Terraform = "true"
  }
}

#Create route table associations
resource "aws_route_table_association" "public" {
  depends_on     = [aws_subnet.public_subnets]
  route_table_id = aws_route_table.public_route_table.id
  for_each       = aws_subnet.public_subnets
  subnet_id      = each.value.id
}

resource "aws_route_table_association" "private" {
  depends_on     = [aws_subnet.private_subnets]
  route_table_id = aws_route_table.private_route_table.id
  for_each       = aws_subnet.private_subnets
  subnet_id      = each.value.id
}

#Create Internet Gateway
resource "aws_internet_gateway" "internet_gateway" {
  vpc_id = aws_vpc.vpc.id
  tags = {
    Name = "demo_igw"
  }
}

#Create EIP for NAT Gateway
resource "aws_eip" "nat_gateway_eip" {
  domain     = "vpc"
  depends_on = [aws_internet_gateway.internet_gateway]
  tags = {
    Name = "demo_igw_eip"
  }
}

#Create NAT Gateway
resource "aws_nat_gateway" "nat_gateway" {
  depends_on    = [aws_subnet.public_subnets]
  allocation_id = aws_eip.nat_gateway_eip.id
  subnet_id     = aws_subnet.public_subnets["public_subnet_1"].id
  tags = {
    Name = "demo_nat_gateway"
  }
}Now that we have our Terraform files ready to go, the last step we need to complete is setting a few environment variables to set our AWS credentials and region used by Terraform. In AWS, generate an access key and secret key from an IAM user with Administrative privileges. If you need help, check out this link with a walk-through.
Once you have credentials, set the following environment variables for Linux, MacOS, or Bash on Windows:
export AWS_ACCESS_KEY_ID="<YOUR ACCESS KEY>"
export AWS_SECRET_ACCESS_KEY="<YOUR SECRET KEY>"
If you're running PowerShell on Windows, you'll need to use the following to set your AWS credentials:
PS C:\> $Env:AWS_ACCESS_KEY_ID="<YOUR ACCESS KEY>"
PS C:\> $Env:AWS_SECRET_ACCESS_KEY="<YOUR SECRET KEY>"
If you're using the default Windows command prompt, you can use the following to set your AWS credentials:
C:\> setx AWS_ACCESS_KEY_ID <YOUR ACCESS KEY>
C:\> setx AWS_SECRET_ACCESS_KEY <YOUR SECRET KEY>
More information on setting credentials for AWS can be found here
The first step to using Terraform is initializing the working directory. In your shell session, type the following command:
terraform initAs a response, you should see something like the following output (note that the provider version might change):
terraform init

Initializing the backend...

Initializing provider plugins...
- Checking for available provider plugins...
- Downloading plugin for provider "aws" (hashicorp/aws) 3.37.0...

Terraform has been successfully initialized!

You may now begin working with Terraform. Try running "terraform plan" to see
any changes that are required for your infrastructure. All Terraform commands
should now work.

If you ever set or change modules or backend configuration for Terraform,
rerun this command to reinitialize your working directory. If you forget, other
commands will detect it and remind you to do so if necessary.Now that our working directory is initialized, we can create a plan for execution. This will provide a preview of the changes to our AWS environment. To create a plan, execute the following command:
terraform planYou should see an output similar to the one below. Note that the example below has been truncated for the sake of brevity:
Refreshing Terraform state in-memory prior to plan...
The refreshed state will be used to calculate this plan, but will not be
persisted to local or remote state storage.

data.aws_region.current: Refreshing state...
data.aws_availability_zones.available: Refreshing state...

------------------------------------------------------------------------

An execution plan has been generated and is shown below.
Resource actions are indicated with the following symbols:
  + create

Terraform will perform the following actions:

  # aws_eip.nat_gateway_eip will be created
  + resource "aws_eip" "nat_gateway_eip" {
      + allocation_id        = (known after apply)
      + association_id       = (known after apply)
      + carrier_ip           = (known after apply)
      + customer_owned_ip    = (known after apply)
      + domain               = (known after apply)
      + id                   = (known after apply)
      + instance             = (known after apply)
      + network_border_group = (known after apply)
      + network_interface    = (known after apply)
      + private_dns          = (known after apply)
      + private_ip           = (known after apply)
      + public_dns           = (known after apply)
      + public_ip            = (known after apply)
      + public_ipv4_pool     = (known after apply)
      + tags                 = {
          + "Name" = "demo_igw_eip"
        }
      + vpc                  = true
    }
...

Plan: 18 to add, 0 to change, 0 to destroy.

------------------------------------------------------------------------

Note: You didn't specify an "-out" parameter to save this plan, so Terraform
can't guarantee that exactly these actions will be performed if
"terraform apply" is subsequently run.
Notice that Terraform will create 18 resources for us in our AWS environment, which includes all of the networking components we manually created in earlier steps.
For our final step to create our AWS resources, we need to apply the configuration. An apply will instruct Terraform to create the resources in AWS that are defined in our configuration file(s). And as we saw in our plan, it will create 18 resources for us. To execute the Terraform, run the following command:
terraform apply -auto-approveNote that we are using the -auto-approve flag for simplicity. You can leave it out, validate the changes to the environment, and type
yesto validate you want to apply the configuration.
After running the above command, you should see output similar to the following:
data.aws_region.current: Refreshing state...
data.aws_availability_zones.available: Refreshing state...

An execution plan has been generated and is shown below.
Resource actions are indicated with the following symbols:
  + create

Terraform will perform the following actions:

  # aws_eip.nat_gateway_eip will be created
  + resource "aws_eip" "nat_gateway_eip" {
      + allocation_id        = (known after apply)
      + association_id       = (known after apply)
      + carrier_ip           = (known after apply)
      + customer_owned_ip    = (known after apply)
      + domain               = (known after apply)
      + id                   = (known after apply)
      + instance             = (known after apply)
      + network_border_group = (known after apply)
      + network_interface    = (known after apply)
      + private_dns          = (known after apply)
      + private_ip           = (known after apply)
      + public_dns           = (known after apply)
      + public_ip            = (known after apply)
      + public_ipv4_pool     = (known after apply)
      + tags                 = {
          + "Name" = "demo_igw_eip"
        }
      + vpc                  = true
    }
...
aws_vpc.vpc: Creating...
aws_vpc.vpc: Still creating... [10s elapsed]
aws_vpc.vpc: Creation complete after 11s [id=vpc-05bf9e6a14d8ee736]
aws_subnet.private_subnets["private_subnet_2"]: Creating...
aws_subnet.public_subnets["public_subnet_3"]: Creating...
aws_internet_gateway.internet_gateway: Creating...
aws_subnet.public_subnets["public_subnet_1"]: Creating...
aws_subnet.private_subnets["private_subnet_1"]: Creating...
aws_subnet.public_subnets["public_subnet_2"]: Creating...
aws_subnet.private_subnets["private_subnet_3"]: Creating...
aws_subnet.private_subnets["private_subnet_3"]: Creation complete after 2s [id=subnet-097ce13a4cd397b92]
aws_subnet.private_subnets["private_subnet_2"]: Creation complete after 2s [id=subnet-0e13dbad1bdcc9b3d]
aws_internet_gateway.internet_gateway: Creation complete after 3s [id=igw-09460c69ff2efdaa7]
aws_eip.nat_gateway_eip: Creating...
aws_route_table.public_route_table: Creating...
aws_subnet.private_subnets["private_subnet_1"]: Creation complete after 3s [id=subnet-0cd287fb292ad3720]
aws_eip.nat_gateway_eip: Creation complete after 1s [id=eipalloc-0834ec4c7cb0ff0d1]
aws_route_table.public_route_table: Creation complete after 2s [id=rtb-0f354a5a7facfe6f1]
aws_subnet.public_subnets["public_subnet_1"]: Still creating... [10s elapsed]
aws_subnet.public_subnets["public_subnet_2"]: Still creating... [10s elapsed]
aws_subnet.public_subnets["public_subnet_3"]: Still creating... [10s elapsed]
aws_subnet.public_subnets["public_subnet_3"]: Creation complete after 13s [id=subnet-09b2418caea54512e]
aws_subnet.public_subnets["public_subnet_2"]: Creation complete after 14s [id=subnet-0fd89ea15770c4658]
aws_subnet.public_subnets["public_subnet_1"]: Creation complete after 15s [id=subnet-0a1cc28bb3bb0d318]
aws_nat_gateway.nat_gateway: Creating...
aws_route_table_association.public["public_subnet_3"]: Creating...
aws_route_table_association.public["public_subnet_1"]: Creating...
aws_route_table_association.public["public_subnet_2"]: Creating...
aws_route_table_association.public["public_subnet_2"]: Creation complete after 0s [id=rtbassoc-014bdb5bfb698ad04]
aws_route_table_association.public["public_subnet_3"]: Creation complete after 0s [id=rtbassoc-0bc228d98326cbfac]
aws_route_table_association.public["public_subnet_1"]: Creation complete after 0s [id=rtbassoc-0b9c0198f2dbac2c9]
aws_nat_gateway.nat_gateway: Still creating... [10s elapsed]
aws_nat_gateway.nat_gateway: Still creating... [20s elapsed]
aws_nat_gateway.nat_gateway: Still creating... [30s elapsed]
aws_nat_gateway.nat_gateway: Still creating... [40s elapsed]
aws_nat_gateway.nat_gateway: Still creating... [50s elapsed]
aws_nat_gateway.nat_gateway: Still creating... [1m0s elapsed]
aws_nat_gateway.nat_gateway: Still creating... [1m10s elapsed]
aws_nat_gateway.nat_gateway: Still creating... [1m20s elapsed]
aws_nat_gateway.nat_gateway: Still creating... [1m30s elapsed]
aws_nat_gateway.nat_gateway: Creation complete after 1m35s [id=nat-037dd8aec387c4069]
aws_route_table.private_route_table: Creating...
aws_route_table.private_route_table: Creation complete after 3s [id=rtb-0d564cf66b5ca1136]
aws_route_table_association.private["private_subnet_3"]: Creating...
aws_route_table_association.private["private_subnet_1"]: Creating...
aws_route_table_association.private["private_subnet_2"]: Creating...
aws_route_table_association.private["private_subnet_3"]: Creation complete after 1s [id=rtbassoc-0f593a3305dd07803]
aws_route_table_association.private["private_subnet_2"]: Creation complete after 1s [id=rtbassoc-0e0c79dd4d1bd7dc7]
aws_route_table_association.private["private_subnet_1"]: Creation complete after 2s [id=rtbassoc-0a3019304223a483a]

Apply complete! Resources: 18 added, 0 changed, 0 destroyed.
At this point, Terraform has created new resources in our AWS account that match the requirements stated at the beginning of the lab. Feel free to log into the AWS console and browse around. You should see the new VPC, subnets, route tables, NAT Gateway, and Internet Gateway. These should look just like our configuration, but completely automated by Terraform.
The final step is to destroy all of the resources created by Terraform. By using Terraform to destroy the resources, you will ensure that every single resource deployed with Terraform is destroyed from your account. This ensures you don't leave anything behind that could incur costs or leave behind technical debt.
To destroy your resources, execute the following command in the terminal. You should see Terraform refresh the state of each resource and subsequently destroy it in the proper order.
terraform destroy -auto-approveYou should an output similar to the following:
aws_nat_gateway.nat_gateway: Destroying... [id=nat-037dd8aec387c4069]
aws_route_table.public_route_table: Destruction complete after 3s
aws_nat_gateway.nat_gateway: Still destroying... [id=nat-037dd8aec387c4069, 10s elapsed]
aws_nat_gateway.nat_gateway: Still destroying... [id=nat-037dd8aec387c4069, 20s elapsed]
aws_nat_gateway.nat_gateway: Still destroying... [id=nat-037dd8aec387c4069, 30s elapsed]
aws_nat_gateway.nat_gateway: Still destroying... [id=nat-037dd8aec387c4069, 40s elapsed]
aws_nat_gateway.nat_gateway: Still destroying... [id=nat-037dd8aec387c4069, 50s elapsed]
aws_nat_gateway.nat_gateway: Destruction complete after 56s
aws_subnet.public_subnets["public_subnet_3"]: Destroying... [id=subnet-09b2418caea54512e]
aws_eip.nat_gateway_eip: Destroying... [id=eipalloc-0834ec4c7cb0ff0d1]
aws_subnet.public_subnets["public_subnet_2"]: Destroying... [id=subnet-0fd89ea15770c4658]
aws_subnet.public_subnets["public_subnet_1"]: Destroying... [id=subnet-0a1cc28bb3bb0d318]
aws_subnet.public_subnets["public_subnet_2"]: Destruction complete after 1s
aws_subnet.public_subnets["public_subnet_3"]: Destruction complete after 1s
aws_subnet.public_subnets["public_subnet_1"]: Destruction complete after 1s
aws_eip.nat_gateway_eip: Destruction complete after 1s
aws_internet_gateway.internet_gateway: Destroying... [id=igw-09460c69ff2efdaa7]
aws_internet_gateway.internet_gateway: Still destroying... [id=igw-09460c69ff2efdaa7, 10s elapsed]
aws_internet_gateway.internet_gateway: Destruction complete after 12s
aws_vpc.vpc: Destroying... [id=vpc-05bf9e6a14d8ee736]
aws_vpc.vpc: Destruction complete after 1s

Destroy complete! Resources: 18 destroyed.