| <Previous: Introduction | Next: Chapter 2> |
There are only two things needed to start working with OpenCV from a Java platform:
- JDK - Java Development Kit
- Build tool like SBT, Gradle, Maven or similar.
Installation of OpenCV is not required, all needed Java and native binaries can be automatically downloaded by the build tool.
Here we will focus on SBT as a build tool (description of Gradle or other setup may be added in the feature, if you are willing to contribute setup and description it will be added here).
One of the important features of SBT, compared for instance to Maven, is the ability to easy run example code from command line. You can also use SBT to interactively execute commands with classpath initialized to your project classpath. This is a very good way to experiment with JavaCV and other projects.
If you prefer to use IDE, you can also open the SBT project directly in IntelliJ IDEA
and NetBeans using their Scala plugins. If you prefer to use Eclipse, you can use SBT to
generate Eclipse project configuration using commend eclipse.
Assuming that you already have JDK installed, the only thing necessary to run examples is to install SBT. SBT will download JavaCV and OpenCV binaries, so do not need to install them.
You can get the Cookbook Examples sources either by cloning the GitHub repository or by downloading then as a ZIP archive clicking on the Download ZIP button on the GitHub page. The examples are in the sub-directory OpenCV_Cookbook.
- Open command prompt or a terminal.
- Change directory the location of
OpenCV_Cookbook - Type
sbtto startSBT - If this is the first time you run SBT it may take a while to download all needed dependencies. Once everything is
ready you should see prompt:
sbt:opencv_cookbook> - Type
runand you will see a long list of available examples:
Multiple main classes detected, select one to run:

 [1] opencv_cookbook.chapter01.Ex1MyFirstOpenCVApp
 [2] opencv_cookbook.chapter01.Ex2MyFirstGUIApp
 [3] opencv_cookbook.chapter01.Ex2MyFirstGUIAppJava

...

Enter number:
Type 1 and you should see example opencv_cookbook.chapter01.Ex1MyFirstOpenCVApp running

Make sure that you have Scala plugin installed, it provides support for SBT too. Scala is one of the standard plugins available in the Community (free) and Ultimate editions of IDEA.
- Select
File>Open. - Navigate to
OpenCV_Cookbookdirectory - Select
build.sbtand clickOK - You will see "Import Project from SBT", you can select "Download sources and docs" and "Download SBT sources and docs"
A simple example of loading and displaying an image using JavaCV is in
class [opencv_cookbook.chapter01.Ex1MyFirstOpenCVApp:
import opencv_cookbook.OpenCVUtils.toBufferedImage
import org.bytedeco.javacv.CanvasFrame
import org.bytedeco.opencv.global.opencv_imgcodecs._

import javax.swing.WindowConstants


/**
  * Example of loading and displaying and image  using JavaCV API,
  * corresponds to C++ example in Chapter 1 page 18.
  * Please note how in the Scala example code CanvasFrame from JavaCV API is used to display the image.
  */
object Ex1MyFirstOpenCVApp extends App {

  // Read an image
  val image = imread("data/boldt.jpg")
  if (image.empty()) {
    // error handling
    // no image has been created...
    // possibly display an error message
    // and quit the application
    println("Error reading image...")
    System.exit(0)
  }

  // Create image window named "My Image".
  //
  // Note that you need to indicate to CanvasFrame not to apply gamma correction,
  // by setting gamma to 1, otherwise the image will not look correct.
  val canvas = new CanvasFrame("My Image", 1)

  // Request closing of the application when the image window is closed
  canvas.setDefaultCloseOperation(WindowConstants.EXIT_ON_CLOSE)

  // Convert from OpenCV Mat to Java Buffered image for display
  // Note that `converter` needs to be closed after use, we use helper function `toBufferedImage` for conversion.
  val bi = toBufferedImage(image)
  // Show image on window
  canvas.showImage(bi)
}
It is based on the example on page 18 of the cookbook. Note how CanvasFrame from JavaCV API is used to display the
image.
JavaCV methods for loading images and saving images are based on based on OpenCV. They are in the
class com.googlecode.javacv.cpp.opencv_highgui. Note that class is named starting with small letter to look similar to
the C++ module opencv_highgui where OpenCV method for reading and writing images are located.
OpenCV has a couple of classes to represent images. Some are ore obsolete, like IplImage and CvMat. We will use the
currently recommended Mat.
Mat images are loaded using method imread, it takes one or two parameters. The first one is a file name, the second
is a conversion parameter, frequently used to load color images area gray scale. Here are some examples.
import org.bytedeco.opencv.opencv_core.Mat
import org.bytedeco.opencv.global.opencv_imgcodecs._

val image1: Mat = imread("data/boldt.jpg")
val image2: Mat = imread("data/boldt.jpg", IMREAD_COLOR)
val image3: Mat = imread("data/boldt.jpg", IMREAD_GRAYSCALE)
The default value for the conversion parameter is IMREAD_COLOR.
If image cannot be loaded both imread will return null. You may want to wrap a call to imread in a method that
throws an exception if an image cannot be loaded.
def load(file: File, flags: Int = IMREAD_GRAYSCALE): Mat = {
  // Verify file
  if (!file.exists()) {
    throw new FileNotFoundException("Image file does not exist: " + file.getAbsolutePath)
  }
  // Read input image
  val image = imread(file.getAbsolutePath, flags)
  if (image == null) {
    throw new IOException("Couldn't load image: " + file.getAbsolutePath)
  }
  // Return loaded image
  image
}The method imwrite(filename, image) saves the image to the specified file. The image format is chosen based on the
filename extension.
imwrite("my_image.png", image1)The easy way to display image using JavaCV is to use CanvasFrame as in the
example Ex1MyFirstOpenCVApp. It
shows the image in a new window.
JavaCV adds to Mat a method getBufferedImage to convert OpenCV data to Java's java.awt.image.BufferedImage that
can be displayed using standard Java approach. You can see example of that in Ex2MyFirstGUIApp, see next section.
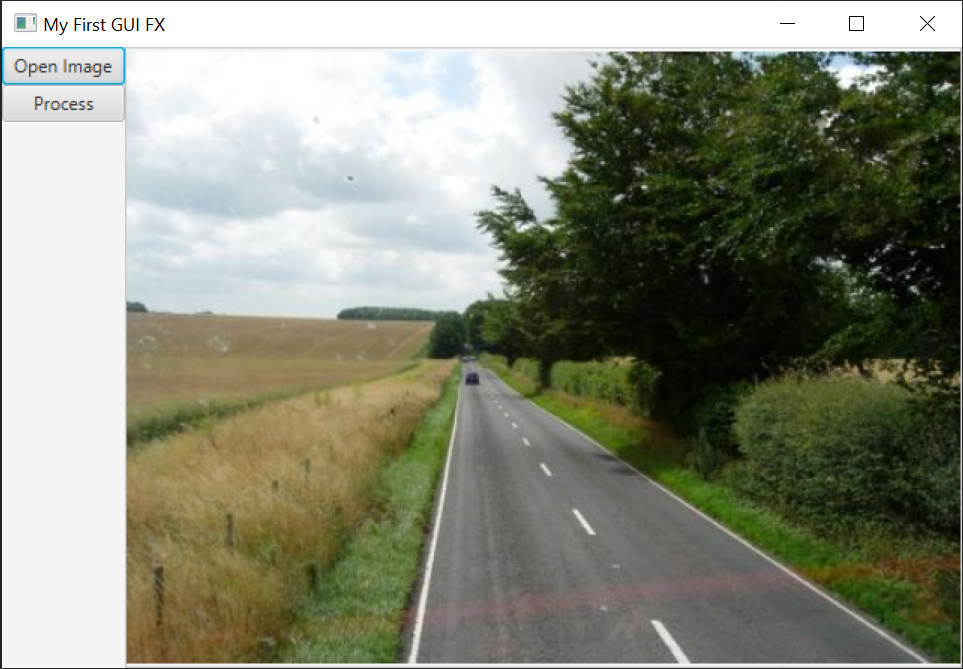
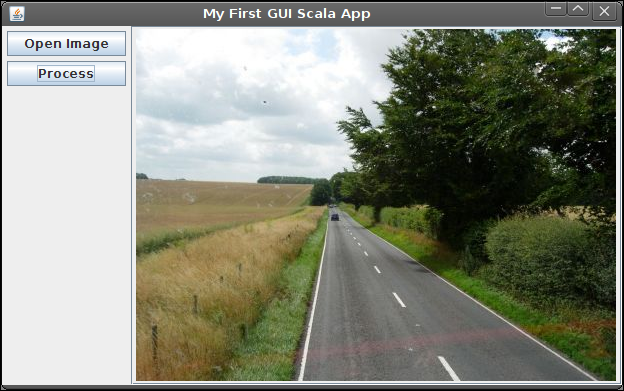
It is not an intention of this module to describe how to create GUI applications in Scala or Java. However, for the sake of completeness equivalents of a Qt GUI application presented in the Cookbook are provided. One using Scala wrapper JavaFX, one for Swing. As the original, it is a simple frame with two buttons "Open Image" and "Process" on the left. Loaded image is displayed in the middle of the frame. The examples are using ScalaFX and Scala Swing frameworks. The frameworks enable writing a more concise JavaFX/Swing code, in this particular example Java core requires about 30% more characters to achieve the same result.
Note: The new GUI framework for building UIs is JavaFX. Working in Scala you may consider ScalaFX over Scala Swing.
You can find code for the Ex2MyFirstGUIFXApp
example
in Ex2MyFirstGUIFXApp.scala.
Java Version is in Ex2MyFirstGUIFXAppJava.java. When running from SBT you will need to start with Ex2MyFirstGUIFXAppJavaLauncher.java
You can find code for the Swing version of the example in Ex2MyFirstGUIApp.scala. An equivalent Java code is in Ex2MyFirstGUIAppJava.java.
| <Previous: Introduction | Chapter 1: Playing with Images | Next: Chapter 2> |