Measuring resonances with ADXL345 accelerometer
When printing at higher speeds, resonances can be quite disturbing and may have a strong impact on your overall printing quality.
To bypass this problem, we use the Klipper-integrated support of the ADXL345 accelerometer (4-5€ on Amazon) for Resonance Compensation.
Klipper has its own guide on this topic, we will get things together, so use it as a reference.
We will use one ADXL345 sensor to measure both, the X and Y axis resonance after each other. If you want to set up two sensors, please stay with the original Klipper manuel linked above.
You will need a soldering iron, wire as well as crimping tools or corresponding wires that can be plugged into the GPIOs of the raspberry and the ADXL345.
We recommend to not connect the ADXL345 until the software configuration is completed.
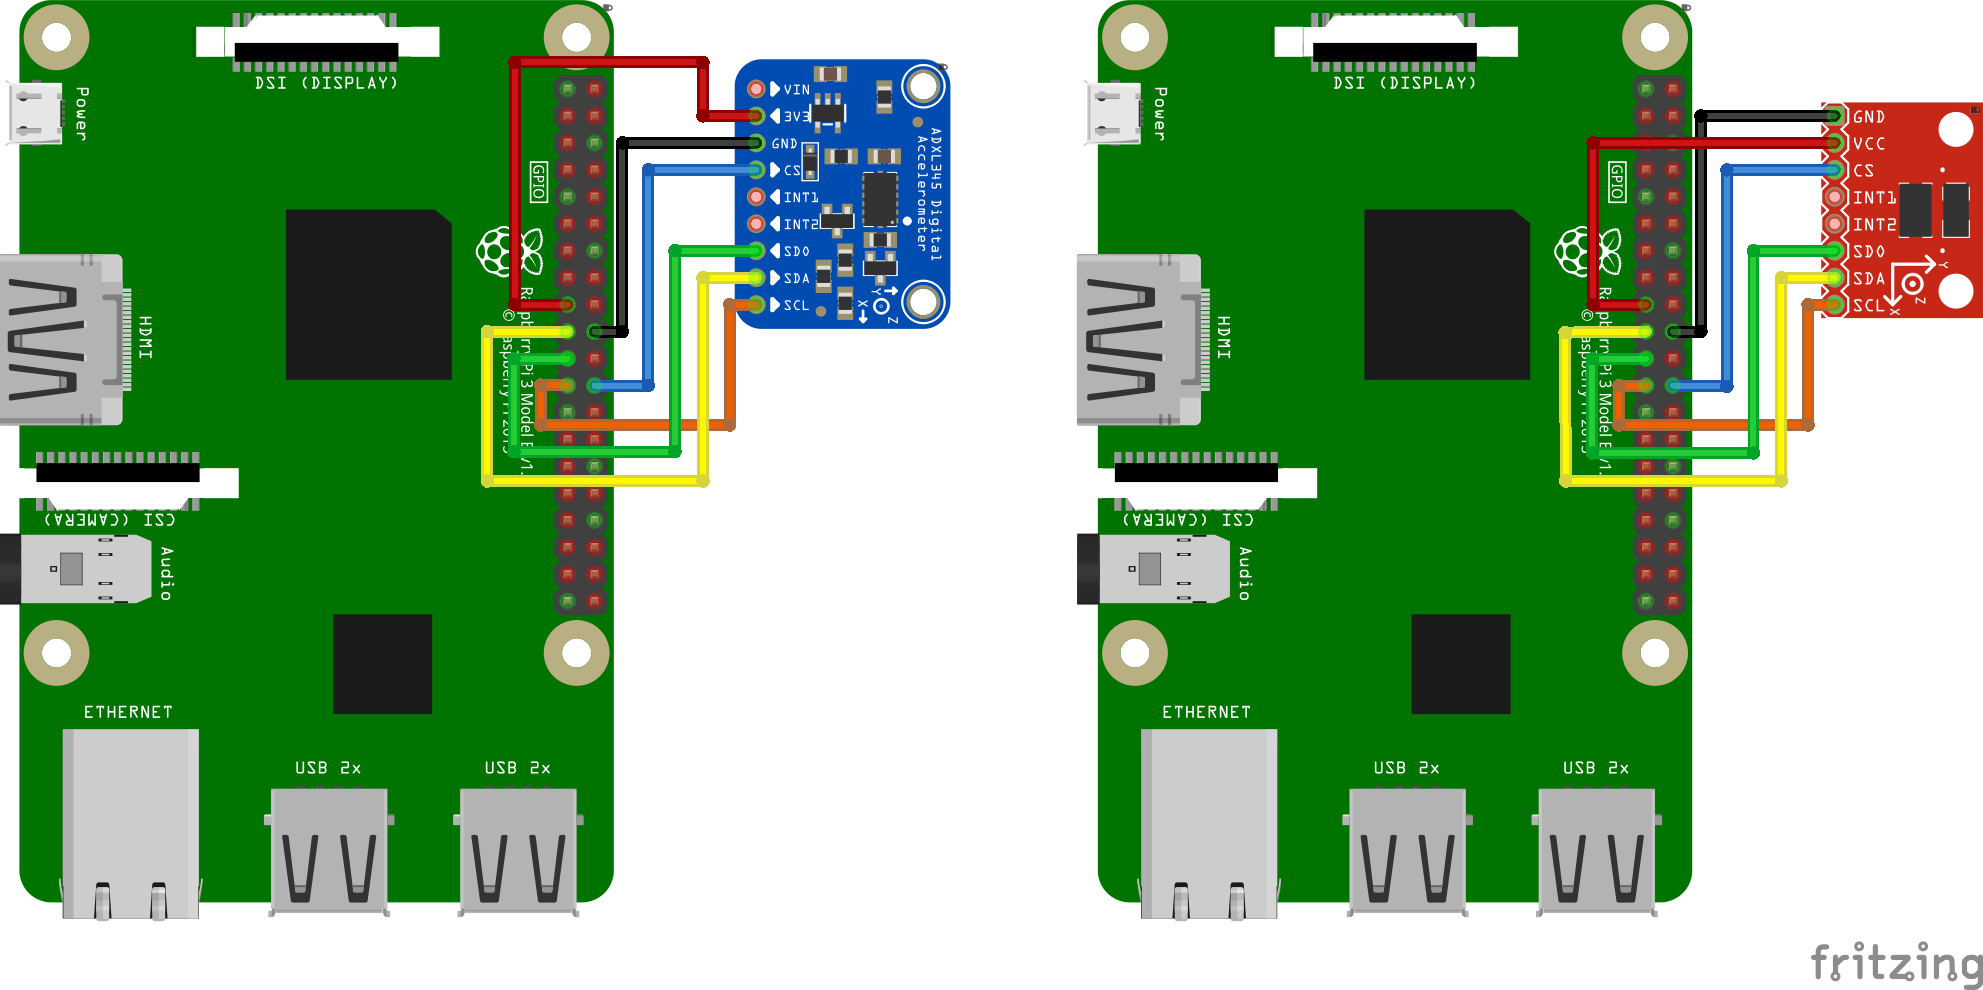
| ADXL345 | Raspberry Pin/GPIO | Pin Name |
|---|---|---|
| 3V3 / VCC | 01 / 3.3v | DC power |
| GND | 06 / GND | Ground |
| CS | 24 / GPIO08 | SPI0_CE0_N |
| SDO | 21 / GPIO09 | SPI0_MISO |
| SDA | 19 / GPIO10 | SPI0_MOSI |
| SCL | 23 / GPIO11 | SPI0_SCLK |
Source (Image and table): Klipper
- Enable the SPI driver in
sudo raspi-config, under "Interfacing options" - Install Numpy Python package:
~/klippy-env/bin/pip install -v numpy - Install required Linux packages:
sudo apt install python-numpy python-matplotlib
To enable Klipper to use the Raspberry GPIO ports and the SPI bus, you have to create a virtual printer, also called "secondary MCU".
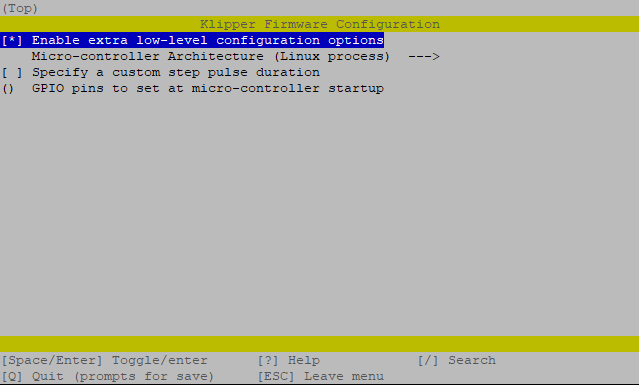
cd ~/klipper/sudo cp "./scripts/klipper-mcu-start.sh" /etc/init.d/klipper_mcusudo update-rc.d klipper_mcu defaultsmake menuconfig- Configure like in the following screenshot. (Enable extra low-level and set Architecture to Linux process)
sudo service klipper stop-
sudo usermod -a -G tty pi(Allow pi user to communicate over serial connection) -
make flash(Your printer board will not be flashed - only a binary file is created for the resonances-purpose. - Take a look at your printer.cfg and enable the line
[include Sensors/pi_adxl_mcu.cfg] sudo service klipper start
So far for the software setup and configuration. Your pi is prepared.
- Shutdown your Raspberry and disconnect it from power to avoid damaging anything.
- Connect the ADXL345 according to the wiring screenshot
- Is the wiring correct? Check multiple times!
- Power up your raspberry and open the Fluidd website
- Enter the following G-Code:
ACCELEROMETER_QUERY - You should see three values.
- To verify your sensor is working correctly, try
MEASURE_AXES_NOISE(Do not move the sensor when executing, it checks for signal noise) - If the noise values are between 1-100 you are good to go. (ours were between 1 und 50, but it seems to depend on the wires and the sensor quality.)
- Too high axes noise (due to Klipper manuel: above 1000) indicates sensor issues.
- Shutdown your Raspberry and disconnect it from power to avoid damaging anything.
- Mount the ADXL345 on top of your Extruder, remove the M3x10 screw and use a M3x14/16 to fix the ADXL345
- We recommend using a plastic washer to avoid damaging the ADXL345 board
- Mount the ADXL345 according to the marking on the board surface so that it is aligned to match the X-axis and Y-axis.
- Power up your raspberry and open the Fluidd website
- Check the sensor again like in the section above.
- If everything looks as expected, edit your printer.cfg and enable the corresponding two lines under
[Printer]: max_accel: 10000-
max_accel_to_decel: 10000(Don't forget to disable these ones afterwards) - Restart Klipper
- Execute the following G-Code and observe your printer carefully. It will gonna vibrate in many frequences:
TEST_RESONANCES AXIS=X - It will generate a CSV-file afterwards (
/tmp/resonances_x_*.csv), which will be analysed later - Copy the csv File to
/home/pito avoid data loss after rebooting your Raspberry.
- Nearly same procedure as mentioned above, but mount the ADXL345 at the protection of your Bed
- Remove the front screw and replace it with the previously used M3x14/16
- Carefully fasten the screw and place the ADXL345 again according to the imprint (X/Y-axes)
- When Klipper is up and running, issue the following G-Code:
TEST_RESONANCES AXIS=Y - Your Y-Axis will now be measured for resonances
- The second CSV-file will be generated afterwards (
/tmp/resonances_y_*.csv) - Also copy it to
/home/pi
- Issue the following two commands in the shell of your Raspberry
~/klipper/scripts/calibrate_shaper.py ~/resonances_x_*.csv -o ~/shaper_calibrate_x.png~/klipper/scripts/calibrate_shaper.py ~/resonances_y_*.csv -o ~/shaper_calibrate_y.png- This scripts generate two PNG files as well as a recommendation value to be set later in your resonance_tester.cfg
Example:
Fitted shaper 'zv' frequency = 46.6 Hz (vibrations = 6.0%, smoothing ~= 0.077)
To avoid too much smoothing with 'zv', suggested max_accel <= 8500 mm/sec^2
Fitted shaper 'mzv' frequency = 45.8 Hz (vibrations = 0.0%, smoothing ~= 0.097)
To avoid too much smoothing with 'mzv', suggested max_accel <= 6200 mm/sec^2
Fitted shaper 'ei' frequency = 54.8 Hz (vibrations = 0.0%, smoothing ~= 0.107)
To avoid too much smoothing with 'ei', suggested max_accel <= 5600 mm/sec^2
Fitted shaper '2hump_ei' frequency = 68.0 Hz (vibrations = 0.0%, smoothing ~= 0.117)
To avoid too much smoothing with '2hump_ei', suggested max_accel <= 5100 mm/sec^2
Fitted shaper '3hump_ei' frequency = 81.2 Hz (vibrations = 0.0%, smoothing ~= 0.124)
To avoid too much smoothing with '3hump_ei', suggested max_accel <= 4800 mm/sec^2
Recommended shaper is mzv @ 45.8 Hz
Just enter the values accordingly.
- How to resolve high frequency responses

- 🏡 Flash bootloader
- ⚙️ Download config files
- 🔌 Install klipper
- 🔧 Create firmware
- 🚀 Adding config files
- 💬 ioBroker integration
- 📢 PINDA troubleshooting
- 📊 Resonance compensation
- ⌨️ Sheet Manager Commands
- 👪 Wiki ToDo list
