Welcome to the Tulip Creative Computer! Here you'll find out all about your new Tulip board that you bought from Makerfabs.
Before we get started, we want to explain the brief history of Tulip and how we work on it. You'll get a lot more out of Tulip if you understand what sort of thing we're building and what sort of community we are.

Tulip has been a side project of mine for a few years. I've always wanted a small low-power computer I could write code or games or music on, that was portable and didn't have distractions like a web browser or work email. Over the years, Tulip has gone through a few iterations from a bunch of wires to the much more polished and cheap board you just bought from our friends at Makerfabs. Along the way, I encouraged a friend to help me with the music synthesizer underlying Tulip. We quickly saw the power and fun of having an excellent analog and FM-style synth that could be controlled in Python on constrained real-time hardware. The Tulip you have in your hands is brand new, we constantly chase bugs, add new features, make new music and demos for it. There's a small but growing community of like minded people on our Discord who try fun experiments as we build.
No one working on Tulip makes any money from it. We're all hobbyists and engineers and scientists and musicians who enjoy working on a small project like this and we hope others can join us. Tulip was designed to be incredibly cheap and completely open source. You can even build one yourself! I've spent the initial money on PCB design to be able to get this version of Tulip in your hands, and you did pay a tiny amount extra over the raw cost of the parts and assembly needed to build Tulip, to support future design work from our partner Makerfabs.
Tulip is fun to use today but still needs help. You should have fun hacking on and using Tulip, and never expect it to be perfect. You will run into lots of weirdness and challenges. We hope you find those constraints entertaining and inspiring. We're hoping to build a community of people that can work together to make Tulip better every day. Remember, if the Tulip firmware doesn't do it for you, you can always use the hardware you bought for your own creations. You can easily replace our firmware and flash it yourself using the ESP-IDF or Arduino.
If you have problems with Tulip, you can find us on GitHub issues or the Discord. We'll do our best to help out!
-- Brian
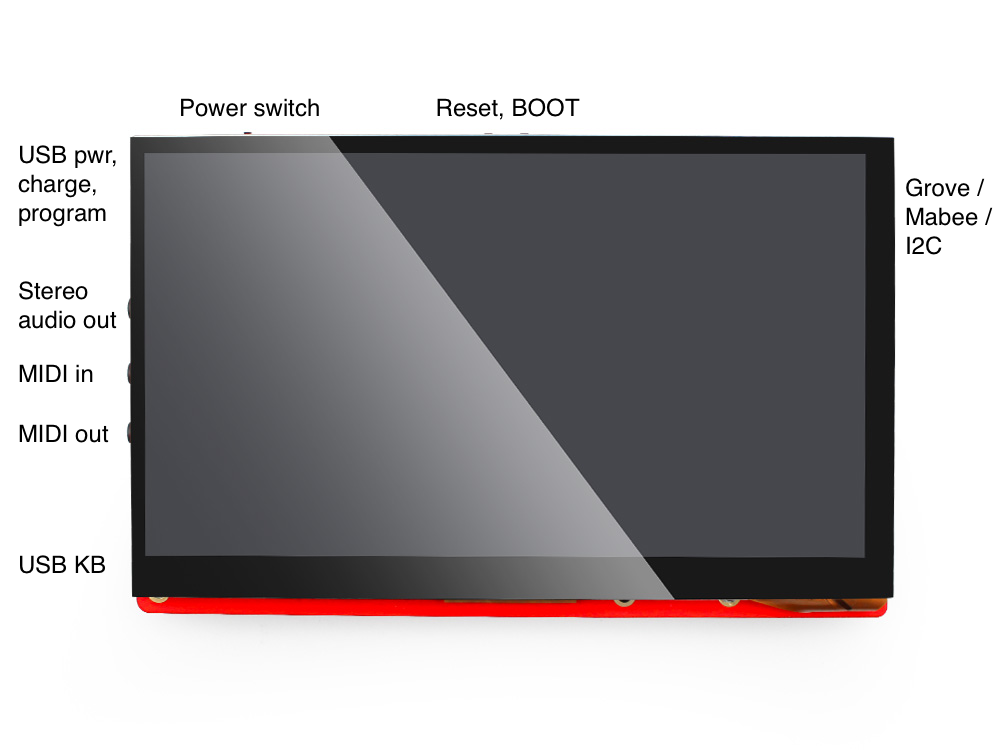
Here's a legend to the ports, facing the front.
The Tulip board you got can work on its own. Most people will want to add a couple of accessories to make it work even better. You should at least get a computer keyboard, the rest are optional.
Tulip is a very command-line centered interface with some touch controls. You'll have a much easier time using Tulip if you connect a USB computer keyboard to it for typing. It turns the Tulip into a portable "deck" for whatever you can imagine.
You can use almost any USB computer keyboard you already have. However, a keyboard including an internal USB hub will not work. You can tell if a keyboard includes a hub if it has one or more subsidiary USB sockets (e.g. for connecting a mouse), or if it includes an integrated pointing device (trackpad, trackball etc). These keyboards are not compatible with Tulip.
If you use modular synths, Tulip is a powerful and fun control surface and way to "program" your modular rig or older analog synth in Python. You can use the existing MIDI ports to do a lot, but if you have CV gear, we recommend getting a I2C DAC to control it. You can get a 2 channel DAC with modular ready 3.5mm jacks from Makerfabs. You can use up to 8 at once for a total of 16 CV outputs!
Most modern MIDI equipment now uses 3.5mm jacks for MIDI connectors. If you have the older 5-pin DIN connectors and want to use them on Tulip, you'll want to pick up a couple of Type-A 3.5mm adapters.
Tulip is a low power device and can run on battery for portable computing. There's a standard JST connector on back for flat li-po or 18650 battery packs. Tulip will charge the battery if you connect a USB power cable to the USB charge/PWR port (the top one.) I personally use this 1200mAh battery. If you want to keep it "inside" Tulip (between the back case and the PCB), you'll want to find a battery that is 5mm or so thin. You can use a piece of double sided tape it keep it inside the battery area of the PCB.
Larger batteries will work great and last longer, but you'll have to remove the back case to make them fit (or mount the battery some other way.) This 5200mAh battery pack will last many many hours on Tulip and fit right on the PCB with the back case removed.

Tulip supports using Alles as extra speakers. You control up to dozens of other speakers wirelessly using the AMY synthesizer for amazing multi-channel audio setups, using only a Tulip to control them! You can get Alles PCBs from our friends at Blinkinlabs.
Now that you've got your Tulip, here's how to get started:
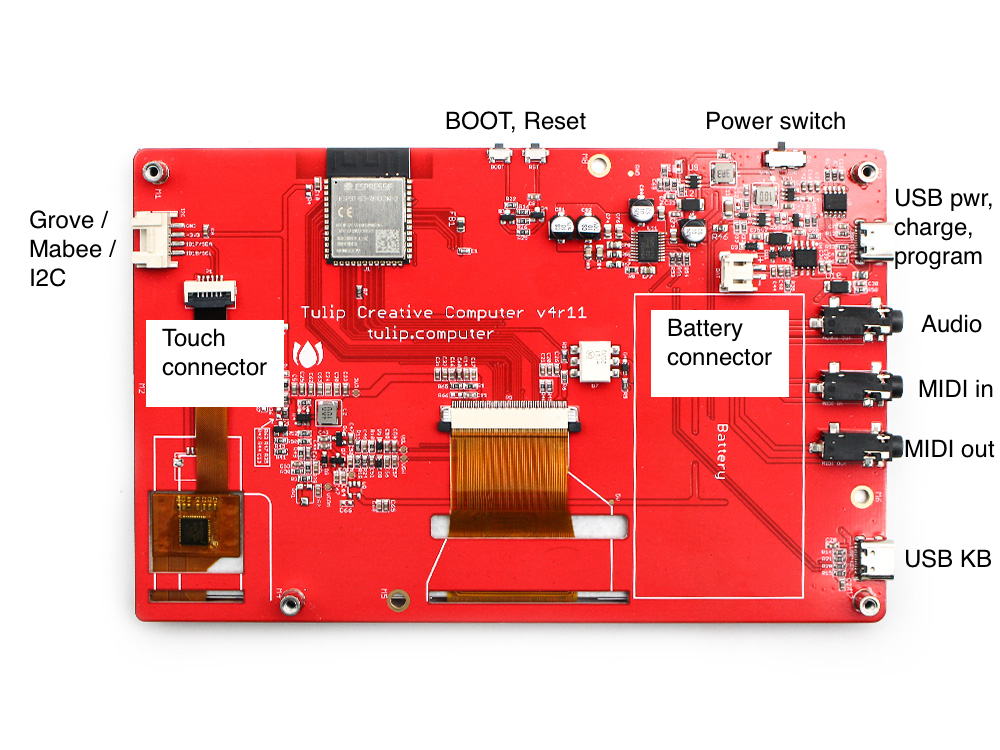
- If you want to use a battery, open the back black case with a screwdriver and plug it in. If you do remove the back case, make sure not to bump the touchscreen connector labeled above as it's been known to be loose (we're working on gluing it down at the factory.)
- Connect a USB-C cable from a power adapter or your computer to the top USB connector, facing Tulip.
- Plug in a USB keyboard to the bottom USB connector.
- Optionally wire up your stereo audio jack, MIDI and I2C connectors if you have them. Headphones will work fine on the audio jack if you don't have a mixer or other sound system.
- Turn on the Tulip! The switch is on the top of the board.
- You should see the following. If you have audio connected, you should also hear a "bleep" sound on startup.
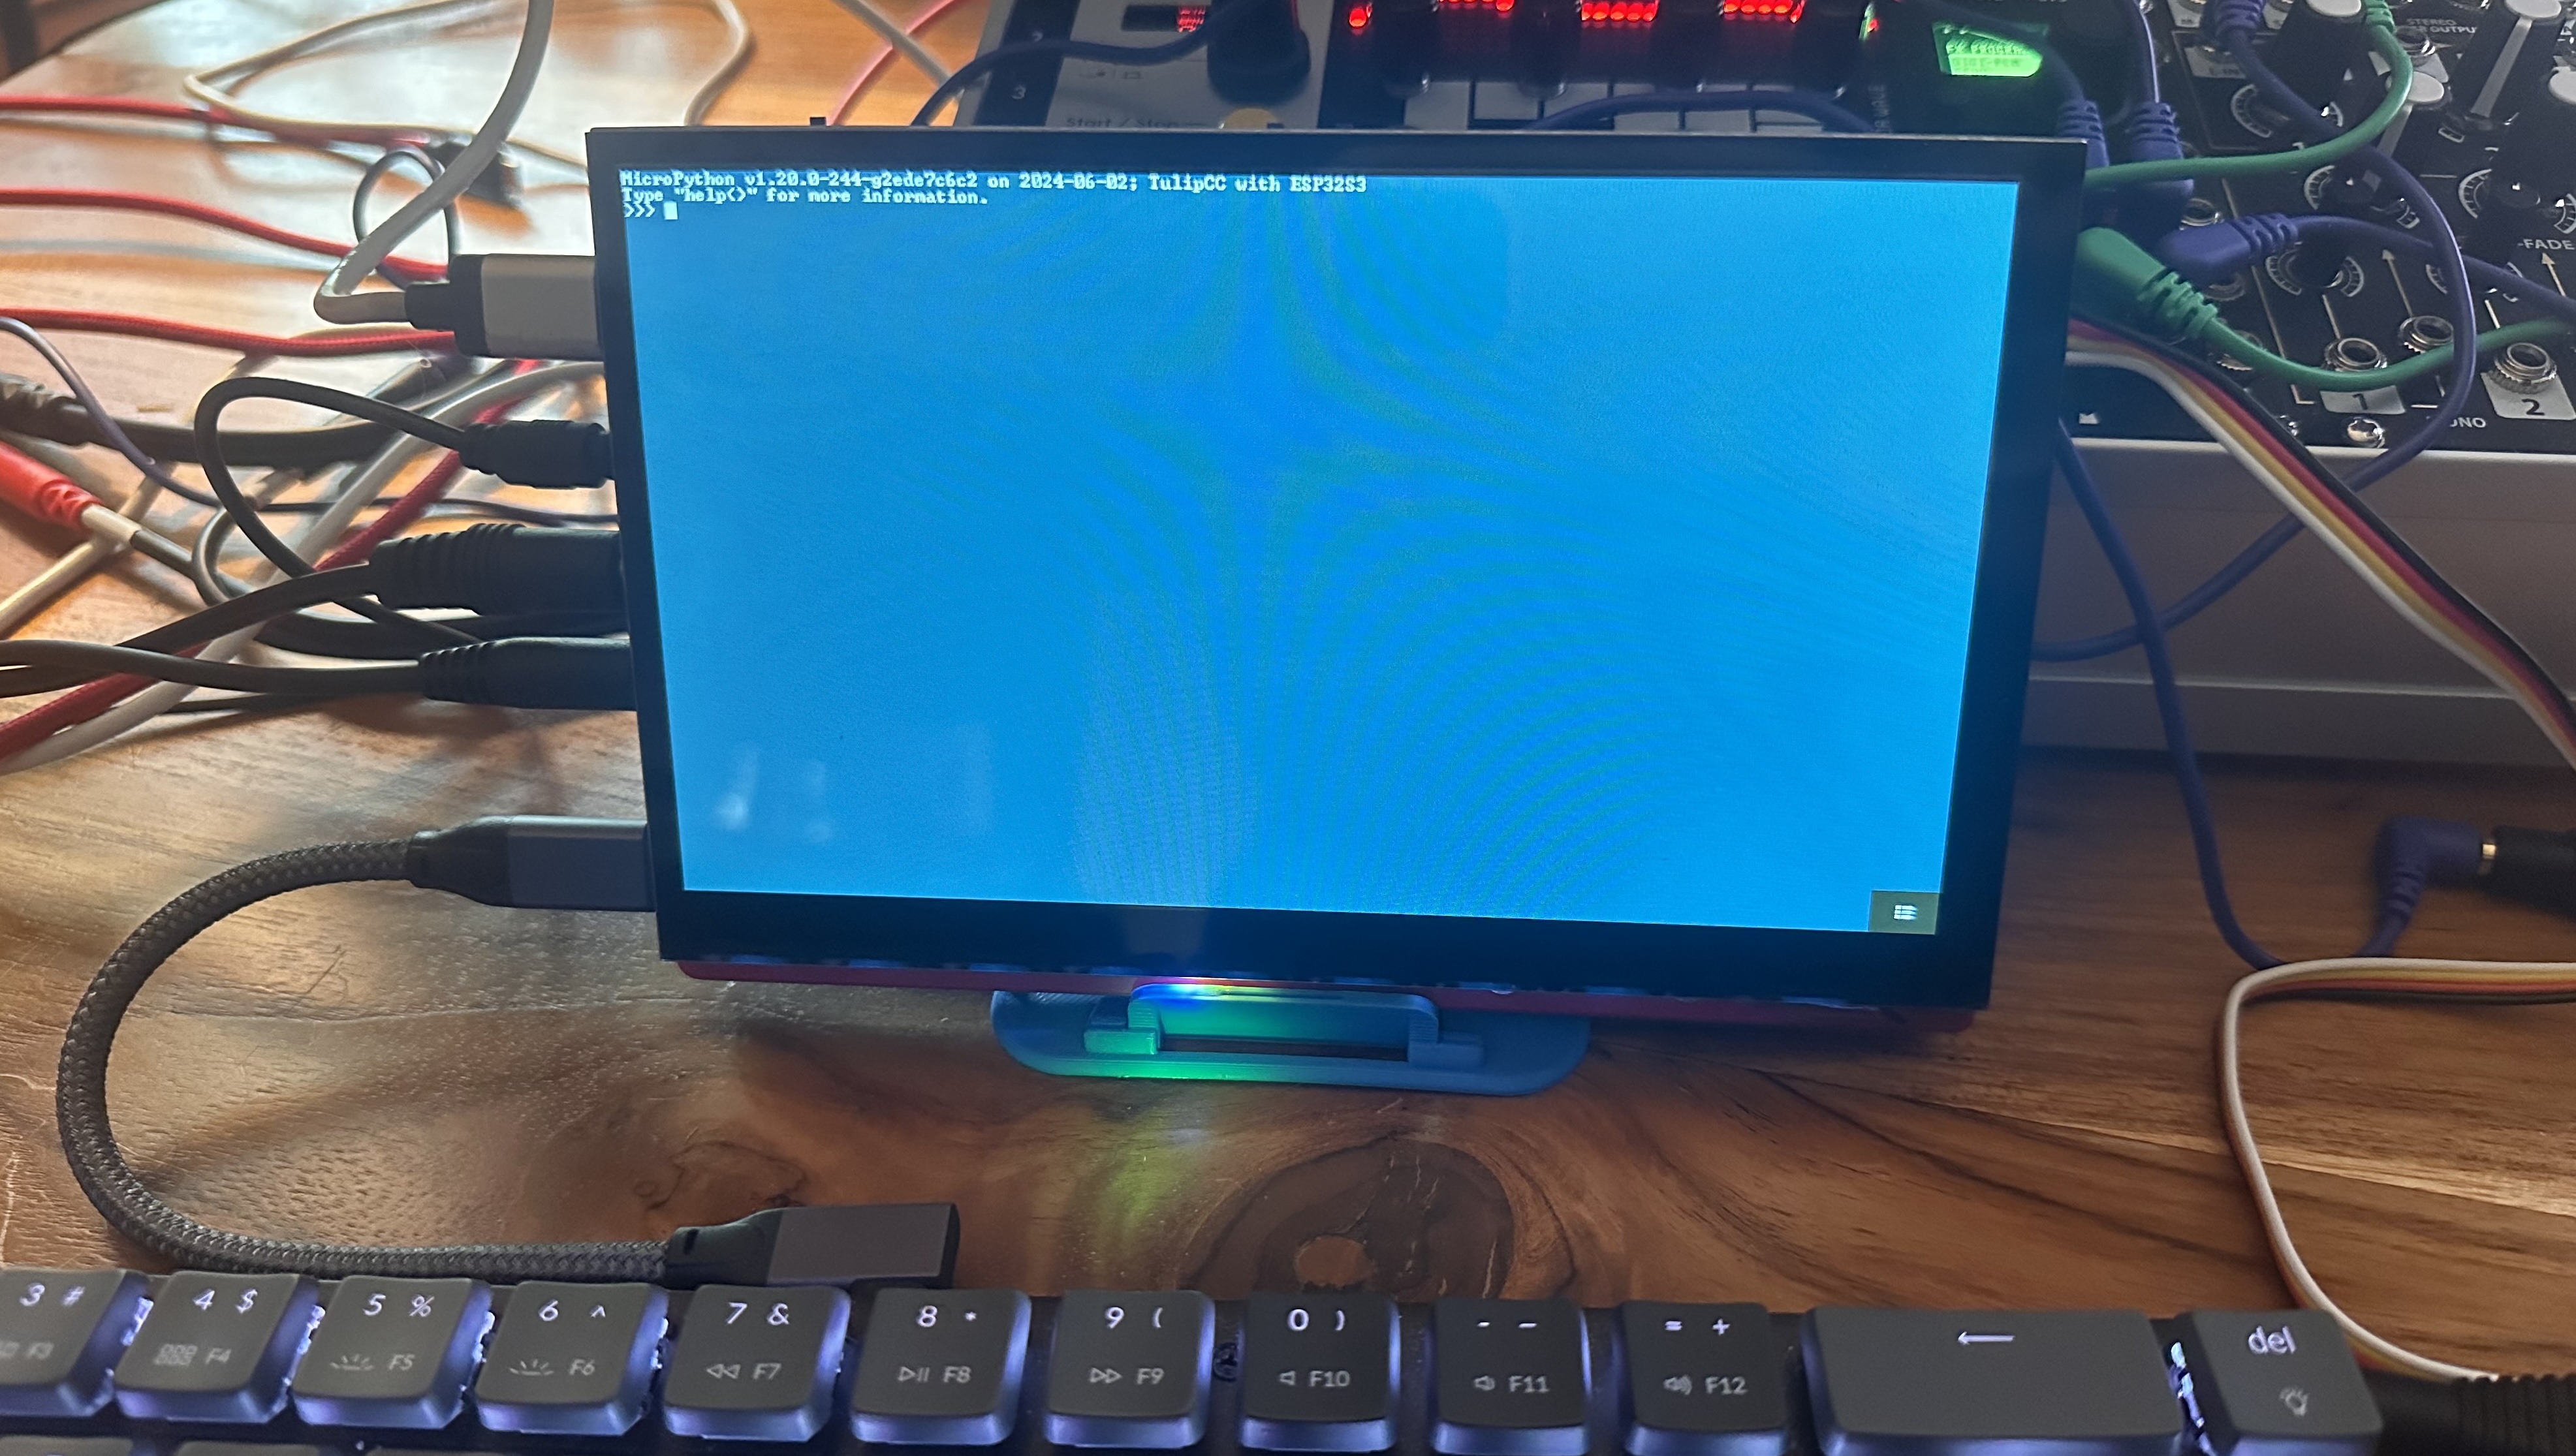
- Your USB keyboard should be able to type into this screen, called the "REPL". It can accept Python code and some simple system commands. Try
lsand you should see a directory listing.
You should upgrade the firmware on Tulip whenever you receive it. You should also upgrade maybe once every week or so. We are constantly adding new features, fixing bugs, updating the API. To upgrade your Tulip, connect it to your Wi-Fi first:
tulip.wifi('ssid', 'password')will return an IP address if successful.tulip.upgrade()will walk you through the upgrade. Accept both upgrades -- the system folder and the firmware. This process will take a few minutes in total. Your Tulip will reboot itself when it is done.
- Type
run('calibrate')to calibrate the touch screen if you think it is needed. - The black icon on the bottom right is a launcher, for quick access to some included programs. Tap on
Drumsand you should see (and hear!) a drum machine. - Tap the top right blue "switch" icon to get back to the REPL. Tap it again to get back to the drum machine. You can also use
control-Tab - Tap the red "quit" icon to quit the drum machine.
- You can
edit('boot.py')to add anything you want to run on Tulip startup, like wifi, or calibration, or setting up a synth. You can save in the editor withcontrol-Xand quit withcontrol-Q. - After joining Wi-Fi, try out Tulip World with
run('worldui')orworld.ls()to see files and messages posted by others! - Other things to try:
- Some games/animations:
run('bunny_bounce')orrun('planet_boing')orrun('parallax')(use control-C to quit), - Music apps:
run('voices'),run('juno6'),run('drums') - Music demo:
run('xanadu') - Other utlities:
run('wordpad'),run('buttons').
- Some games/animations:
- The code for all of these are available, for you to modify or learn from. We ship a copy of
drums,voicesandjuno6asmy_drums,my_voices,my_juno6in/sys/exif you want to edit those. The official versions are read-only and you can't mess them up! - If you've got MIDI plugged in, try playing a note! Tulip boots with Juno-6 patch #0 on MIDI Channel 1. You can use the
voicesapp to change that assignment. If you want your MIDI knobs / sliders to control things like the Juno-6 parameters inrun('juno6'), run a script to learn the sliders and update the midi mapping:import learn_midi_codes. Note you'll need to "learn" at least 13 buttons, 8 knobs and 9 sliders for full control of Juno. - Try
world.download('mc_dance')orworld.download('periodic2')for some neat things by the Tulip community.
Your next stop: check out our making music on Tulip tutorial
Then, check out the API for making your own music, games, graphics with Tulip.
If you're having any issues with your Tulip, please check out our troubleshooting guide.
If you find yourself wanting to write Tulip code on a "real" computer, check out Tulip Desktop, which simulates the Tulip hardware, or, see below how to transfer and edit files remotely.
There are a few ways to files between Tulip and your computer. You can connect Tulip to your computer over a USB cable (the top USB port, the charging/UART/power port) and use a program called mpremote, or you can do it wirelessly by turning on Wi-Fi on the Tulip and using our Tulip World BBS or setting up a little server on your computer.
mpremote is provided by the MicroPython project to be able to control and interact with MicroPython on many kinds of devices, including Tulip! It connects to Tulip over the UART USB connection and you are able to use the Tulip REPL, edit, upload and download files. (It does a lot more, but we'll just discuss file transfer here.)
You may need to install the USB->Serial driver first for your computer's OS. Some OSes already have it installed and some don't. If mpremote can't find a port, try to install the CH340K drivers..
First, install mpremoteon your computer. Usually, this is (in your Terminal app) pip install mpremote. (If you don't have pip, please search for how to install it on your OS.) Once it's installed, make sure you've connected a USB cable from Tulip's top USB port - "USB pwr/charge/program" - to your computer. Then, with Tulip on, just run mpremote on your computer's terminal. You should see the Tulip's REPL on your screen! You can type into it and see it there. It's a fine way to control almost all of Tulip.
To transfer a file from your computer to Tulip from mpremote, use mpremote resume fs cp local_file.py :tulip_file.py. This takes a file called local_file.py on your computer in the folder you're in, and transfers it to the current Tulip directory, calling it tulip_file.py. It's pretty fast! To transfer a file from Tulip to your computer, do it in reverse: mpremote resule fs cp :tulip_file.py local_file.py.
To edit a file on Tulip directly on your computer, just do mpremote resume edit file.py. This will open whatever EDITOR you have set in your shell's environment. Once you save it in your editor, it'll be saved on Tulip!
A very useful way to interact with files on your local computer in Tulip is to use mpremote resume mount. This lets you "mount" a local folder on your computer on Tulip, and you can run files and interact with them as if they were locally there. Try mpremote resume mount . to 'mount' the current directory on your computer to Tulip's /remote. mpremote will show you a REPL already in the right directory, but you can then move over to your Tulip to continue working there.
See a lot more about mpremote. Note that we've only confirmed Tulip to work with the fs, mount and repl commands so far. And on Tulip, you always need to add resume to your mpremote command. If you have any issues let us know!
With Wi-Fi, after you do tulip.wifi('ssid', 'password') first, there are two ways of getting files between Tulip hardware and your computer:
-
Use Tulip World and Tulip Desktop: On Tulip Desktop your files are in your
~/.local/share/tulipcc/userfolder. You can edit and add files there directly and useworld.upload(folder)orworld.upload(filename)to place files on Tulip World from either Deskop or hardware Tulip. You can retrieve these files withworld.download(folder)orworld.download(filename). The only downside to this method is that your files are publicly available to anyone else on Tulip World, so please don't share private information using Tulip World. -
Use our file transfer script: You can privately transfer files to and from a Tulip with our Python script file_server.py. Download that script to your computer somewhere. Then, on your computer's terminal, run it, like
$ python file_server.py. Wherever you run that script, all files in the folder you ran it from will be available to your Tulip. Use your computers' network manager to find out your computers' IP address (the192.168.1.23bit below is an example of it.)
You can transfer any files from a computer to Tulip withtulip.url_save(url, filename)like:tulip.url_save('http://192.168.1.23:8000/file.py', 'file.py'). Thefile.pyshould be a file in the current directory that you've runfile_server.pyfrom.
To transfer from a Tulip to a computer, usetulip.url_put(url, file)liketulip.url_put('http://192.168.1.23:8000', 'file.py')and it will appear in that folder on your computer.
 Chat about Tulip on our Discord!
Have fun! See you on Tulip World!