This documentation helps a beginner to install and Configuring OpenLDAP server on Ubuntu server and also helps in installing the phpLDAPadmin web-based management tool through which we can configure(add users/groups e.t.c) on our openldap server.
OpenLDAP is an open-source and fast directory server that provides network client with directory services. Client applications connect to OpenLDAP server using the Lightweight Directory Access Protocol (LDAP) to access organizational information stored on that server. Given the appropriate access, clients can search the directory, modify and manipulate records in the directory. OpenLDAP is efficient on both reading and modifying data in the directory. OpenLDAP servers are most commonly used to provide centralized management of user accounts.
Run the following command to install OpenLDAP server and the client command-line utilities from Ubuntu 16.04 package repository. slapd stands for the Stand-Alone LDAP Daemon.
sudo apt install slapd ldap-utils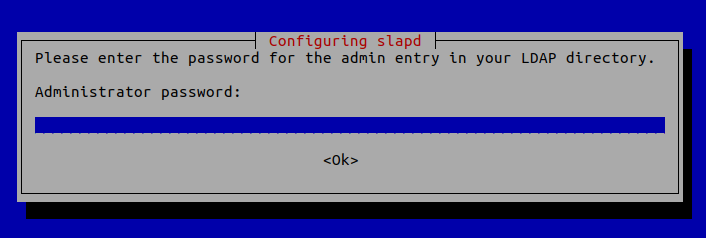
Once it’s done, slapd will be automatically started. You can check out its status with:
systemctl status slapdBe default, it runs as the openldap user as is defined in /etc/default/slapd file.
The installation process installs the package without any configurations. To have our OpenLDAP server running properly, we need to do some basic post-installation configuration. Run the following command to start the configuration wizard.
sudo dpkg-reconfigure slapd
You will need to answer a series of questions. Answer these questions as follows:
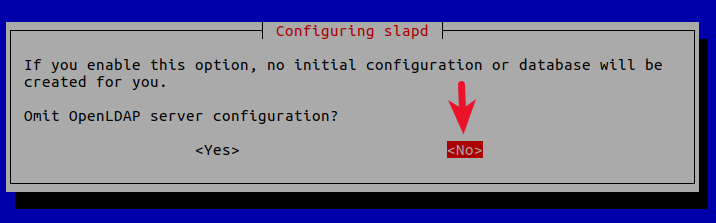
1 . Omit LDAP server configuration: NO
2 . When asked for Domain Name :XXXX(This will be used as base DN of the LDAP directory)
Example : learndeltax.com
3 . Organization name: Enter your organization name
Example : IBM
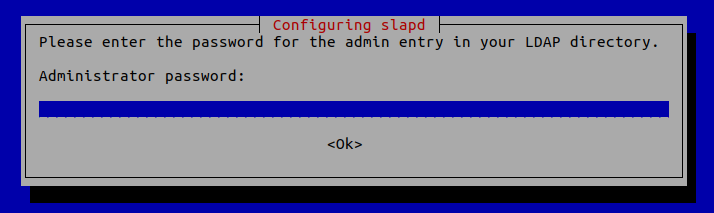
4 . Administrator password: Enter the same password set during installation.
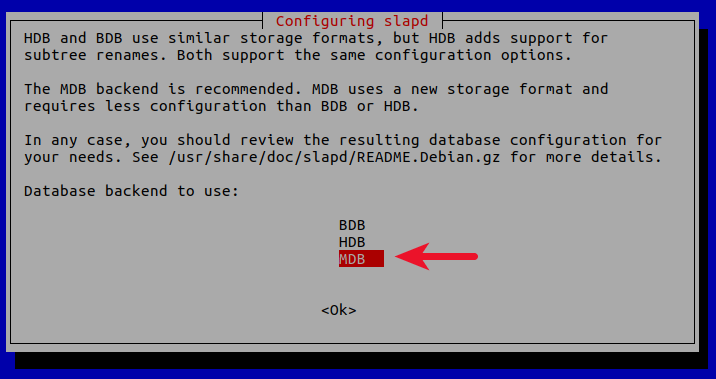
5 . Database backend: MDB
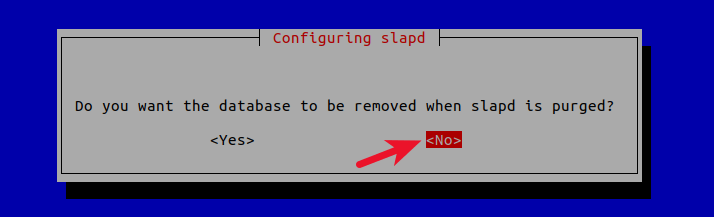
6 . Do you want the database to be removed when slapd is purged? No
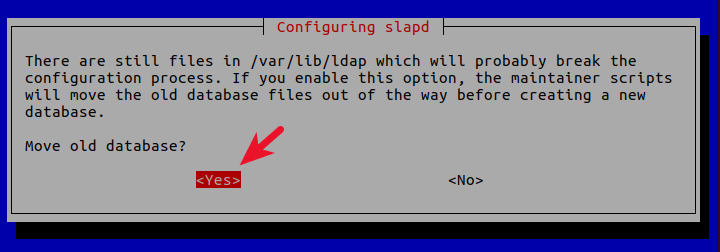
7 . Move old database? Yes
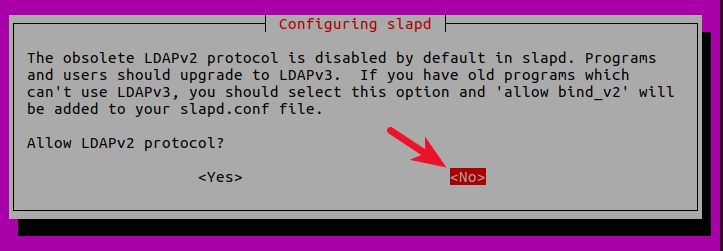
8 . Allow LDAPv2 protocol? No. The latest version of LDAP is LDAP v.3, developed in 1997. LDAPv2 is obsolete.
9 . Now the process will reconfigure the OpenLDAP service according to your answers. Your OpenLDAP server is now ready to use.
By using the above mentioned steps, we will have the non-secure openldap server working.
Although it is very possible to administer LDAP through the command line, most users will find it easier to use a web interface. We're going to install phpLDAPadmin, which provides this functionality, to help remove some of the friction of learning the LDAP tools.
The Ubuntu repositories contain the phpLDAPadmin package. You can install it by typing:
sudo apt-get install phpldapadminThis should install the administration interface, enable the necessary Apache virtual hosts files, and reload Apache.
The web server is now configured to serve your application, but we will make some additional changes. We need to configure phpLDAPadmin to use the domain schema we configured for LDAP, and we are also going to make some adjustments to secure our configuration a little bit. Configure phpLDAPadmin
Now that the package is installed, we need to configure a few things so that it can connect with the LDAP directory structure that was created during the OpenLDAP configuration stage.
Begin by opening the main configuration file with root privileges in your text editor:
sudo nano /etc/phpldapadmin/config.phpIn this file, we need to add the configuration details that we set up for our LDAP server. Start by looking for the host parameter and setting it to your server's domain name or public IP address. This parameter should reflect the way you plan on accessing the web interface:
$servers->setValue('server','host','127.0.0.1');
Next up, you'll need to configure the domain name you selected for your LDAP server. Remember, in our example we selected test.com. We need to translate this into LDAP syntax by replacing each domain component (everything not a dot) into the value of a dc specification.
All this means is that instead of writing learndeltax.com, we will write something like dc=learndeltax,dc=com. We should find the parameter that sets the server base parameter and use the format we just discussed to reference the domain we decided on:
$servers->setValue('server','base',array());
We need to adjust this same thing in our login bind_id parameter. The cn parameter is already set as "admin". This is correct. We just need to adjust the dc portions again, just as we did above:
$servers->setValue('login','bind_id','cn=admin,dc=learndeltax,dc=com');
The last thing that we need to adjust is a setting that control the visibility of warning messages. By default phpLDAPadmin will throw quite a few annoying warning messages in its web interface about the template files that have no impact on the functionality.
We can hide these by searching for the hide_template_warning parameter, uncommenting the line that contains it, and setting it to "true":
$config->custom->appearance['hide_template_warning'] = true;
This is the last thing that we need to adjust. You can save and close the file when you are finished.
There are two ways to encrypt LDAP connections with SSL/TLS.
Traditionally, LDAP connections that needed to be encrypted were handled on a separate port, typically 636. The entire connection would be wrapped with SSL/TLS. This process, called LDAP over SSL, uses the ldaps:// protocol. This method of encryption is now deprecated.
STARTTLS is an alternative approach that is now the preferred method of encrypting an LDAP connection. STARTTLS "upgrades" a non-encrypted connection by wrapping it with SSL/TLS after/during the connection process. This allows unencrypted and encrypted connections to be handled by the same port. This guide will utilize STARTTLS to encrypt connections.
Once your OpenLDAP server is configured, we can go ahead and install the packages we'll use to encrypt our connection. The Ubuntu OpenLDAP package is compiled against the GnuTLS SSL libraries, so we will use GnuTLS to generate our SSL credentials:
sudo apt-get install gnutls-bin ssl-certWith all of our tools installed, we can begin creating the certificates and keys needed to encrypt our connections.
The default slapd package in debian stretch uses gnutls to perform it’s crypto operations by default and NOT openssl. So while generating certificates keep that in mind (some options are meant for slapd built against Mozilla’s NSS and some are for OpenSSL).
To encrypt our connections, we'll need to configure a certificate authority and use it to sign the keys for the LDAP server(s) in our infrastructure. So for our single server setup, we will need two sets of key/certificate pairs: one for the certificate authority itself and one that is associated with the LDAP service.
To create the certificates needed to represent these entities, we'll create some template files. These will contain the information that the certtool utility needs in order to create certificates with the appropriate properties.
Start by making a directory to store the template files:
sudo mkdir /etc/ssl/templatesCreate the template for the certificate authority first. We'll call the file ca_server.conf. Create and open the file in your text editor:
sudo nano /etc/ssl/templates/ca_server.confWe only need to provide a few pieces of information in order to successfully create a certificate authority. We need to specify that the certificate will be for a CA (certificate authority) by adding the ca option. We also need the cert_signing_key option to give the generated certificate the ability to sign additional certificates. We can set the cn to whatever descriptive name we'd like for our certificate authority:
caserver.conf
cn = LDAP Server CA
ca
cert_signing_key
Save and close the file.
Next, we can create a template for our LDAP server certificate called ldap_server.conf. Create and open the file in your text editor with sudo privileges:
sudo nano /etc/ssl/templates/ldap_server.confHere, we'll provide a few different pieces of information. We'll provide the name of our organization and set the tls_www_server, encryption_key, and signing_key options so that our cert has the basic functionality it needs.
The cn in this template must match the FQDN of the LDAP server. If this value does not match, the client will reject the server's certificate. We will also set the expiration date for the certificate. We'll create a 10 year certificate to avoid having to manage frequent renewals:
ldapserver.conf
organization = "IBM"
cn = learndeltax.com
tls_www_server
encryption_key
signing_key
expiration_days = 3652
Save and close the file when you're finished. Create CA Key and Certificate
Now that we have our templates, we can create our two key/certificate pairs. We need to create the certificate authority's set first.
Use the certtool utility to generate a private key. The /etc/ssl/private directory is protected from non-root users and is the appropriate location to place the private keys we will be generating. We can generate a private key and write it to a file called ca_server.key within this directory by typing:
sudo certtool -p --outfile /etc/ssl/private/ca_server.keyNow, we can use the private key that we just generated and the template file we created in the last section to create the certificate authority certificate. We will write this to a file in the /etc/ssl/certs directory called ca_server.pem:
sudo certtool -s --load-privkey /etc/ssl/private/ca_server.key --template /etc/ssl/templates/ca_server.conf --outfile /etc/ssl/certs/ca_server.pemWe now have the private key and certificate pair for our certificate authority. We can use this to sign the key that will be used to actually encrypt the LDAP session. Create LDAP Service Key and Certificate
Next, we need to generate a private key for our LDAP server. We will again put the generated key in the /etc/ssl/private directory for security purposes and will call the file ldap_server.key for clarity.
We can generate the appropriate key by typing:
sudo certtool -p --sec-param high --outfile /etc/ssl/private/ldap_server.keyOnce we have the private key for the LDAP server, we have everything we need to generate a certificate for the server. We will need to pull in almost all of the components we've created thus far (the CA certificate and key, the LDAP server key, and the LDAP server template).
We will put the certificate in the /etc/ssl/certs directory and name it ldap_server.pem. The command we need is:
sudo certtool -c --load-privkey /etc/ssl/private/ldap_server.key --load-ca-certificate /etc/ssl/certs/ca_server.pem --load-ca-privkey /etc/ssl/private/ca_server.key --template /etc/ssl/templates/ldap_server.conf --outfile /etc/ssl/certs/ldap_server.pemWe now have all of the certificates and keys we need. However, currently, our OpenLDAP process will be unable to access its own key.
A group called ssl-cert already exists as the group-owner of the /etc/ssl/private directory. We can add the user our OpenLDAP process runs under (openldap) to this group:
sudo usermod -aG ssl-cert openldapNow, our OpenLDAP user has access to the directory. We still need to give that group ownership of the ldap_server.key file though so that we can allow read access. Give the ssl-cert group ownership over that file by typing:
sudo chown :ssl-cert /etc/ssl/private/ldap_server.keyNow, give the ssl-cert group read access to the file:
sudo chmod 640 /etc/ssl/private/ldap_server.keyOur OpenSSL process can now access the key file properly.
We have our files and have configured access to the components correctly. Now, we need to modify our OpenLDAP configuration to use the files we've made. We will do this by creating an LDIF file with our configuration changes and loading it into our LDAP instance.
Move to your home directory and open a file called addcerts.ldif. We will put our configuration changes in this file:
cd ~
nano addcerts.ldif
To make configuration changes, we need to target the cn=config entry of the configuration DIT. We need to specify that we are wanting to modify the attributes of the entry. Afterwards we need to add the olcTLSCACertificateFile, olcCertificateFile, and olcCertificateKeyFile attributes and set them to the correct file locations.
The end result will look like this:
addcerts.ldif
dn: cn=config
changetype: modify
add: olcTLSCACertificateFile
olcTLSCACertificateFile: /etc/ssl/certs/ca_server.pem
-
add: olcTLSCertificateFile
olcTLSCertificateFile: /etc/ssl/certs/ldap_server.pem
-
add: olcTLSCertificateKeyFile
olcTLSCertificateKeyFile: /etc/ssl/private/ldap_server.key
Save and close the file when you are finished. Apply the changes to your OpenLDAP system using the ldapmodify command:
sudo ldapmodify -H ldapi:// -Y EXTERNAL -f addcerts.ldifWe can reload OpenLDAP to apply the changes:
sudo service slapd force-reloadOur clients can now encrypt their connections to the server over the conventional ldap:// port by using STARTTLS.
In order to connect to the LDAP server and initiate a STARTTLS upgrade, the clients must have access to the certificate authority certificate and must request the upgrade. On the OpenLDAP Server
If you are interacting with the OpenLDAP server from the server itself, you can set up the client utilities by copying the CA certificate and adjusting the client configuration file.
First, copy the CA certificate from the /etc/ssl/certs directory to a file within the /etc/ldap directory. We will call this file ca_certs.pem. This file can be used to store all of the CA certificates that clients on this machine may wish to access. For our purposes, this will only contain a single certificate:
sudo cp /etc/ssl/certs/ca_server.pem /etc/ldap/ca_certs.pemNow, we can adjust the system-wide configuration file for the OpenLDAP utilities. Open up the configuration file in your text editor with sudo privileges:
sudo nano /etc/ldap/ldap.confAdjust the value of the TLS_CACERT option to point to the file we just created:/etc/ldap/ldap.conf
. . .

TLS_CACERT /etc/ldap/ca_certs.pem

. . .
Save and close the file.
If you are connecting to your OpenLDAP server from remote servers, you will need to complete a similar process. First, you must copy the CA certificate to the client machine. You can do this easily with the scp utility.
Once you are connected to the OpenLDAP client, you can copy the CA certificate by typing:
scp [email protected]:/etc/ssl/certs/ca_server.pem ~/Now, append the copied certificate to the list of CA certificates that the client knows about. This will append the certificate to the file if it already exists and will create the file if it doesn't:
cat ~/ca_server.pem | sudo tee -a /etc/ldap/ca_certs.pemNext, we can adjust the global configuration file for the LDAP utilities to point to our ca_certs.pem file. Open the file with sudo privileges:
sudo nano /etc/ldap/ldap.confFind the TLS_CACERT option and set it to the ca_certs.pem file:/etc/ldap/ldap.conf
. . .

TLS_CACERT /etc/ldap/ca_certs.pem

. . .
Save and close the file when you are finished.
We need to make a change in the slapd confiuration to make sure it demands the client to produce a certificate.This can be done by including the following flag into the slapd.conf.
olcTLSVerifyClient : DemandAnd we should also make changes to point the client certificate in the nslcd.conf.