This activity provides a basic understanding of webtechnology relevant for Digital Humanities as well as a hands-on introduction to the principal technologies that make web pages work: HTML, CSS, and JavaScript. These are large technologies that cannot be learned in a day, but the good news is that it doesn’t take much practice to become familiar and comfortable with the features you use most. There are links at the bottom of this page to tutorials and references, which you can visit to learn more.
When thinking about the Internet the first thing that often comes to mind are specific activities: email, file transfer, messaging, data storage in the "cloud" and also the World Wide Web (www). But these are only the surface of what the Internet. A core concept and the technology behind all the services we are operating with today is the network.
The hardware backbone and core technology is the Internet, which stands for interconnected networks. Thus these are computers that are connected to a loose association of thousands of different networks, run by different organization and using different technologies, which are connected together in a giant network of networks. Here the network is not just a software implementation but indeed a massive physical hardware infrastructure, making the connection between computers and networks possible and therewith enabling the communication we are used to today.
First of all we need protocols, that define the format and the order of messages exchanged between two or more communicating entities, as well as the actions taken using that message.
- All activity in the Internet that involves multiple remote entities is governed by a protocol.
- What happens when you make a request to a Web server?
- you type the URL of a Web page into your Web browser.
- Your computer sends a connection request message to the Web server and waits for a reply.
- The Web server receives your connection request message and returns a connection reply message.
- Knowing that it is now OK to request the Web document, your computer sends the name of the Web page it wants to fetch from that Web server in a GET message.
- Finally, the Web server returns the Web page (file) to your computer.
The most common network protocol, that makes enables the data exchange between two computers, is the combination of TCP/IP. This is by now the standard in network technology on the Internet.
TCP (Transmission Control Protocol) establishes the connection among sending and receiving computers on the network. It handles the dissassembly of packets at the point of transmission, and their reassembly at the receiving end.
IP (Internet Protocol) provides the Internet's addressing scheme.
Thus the basis of the Internet Communication is the so-called packet switching
- In a network application, end systems exchange messages with each other.
- Messages can contain anything the application designer wants, such as an email message, a JPEG image, or an MP3 audio file.
- The sender breaks long messages into smaller chunks of data known as packets. This happens with the TCP protocol.
- Between sender and receiver, each packet travels through communication links and packet switches. The route of each packet through the network can vary.
- At the recipient the TCP protocol reassembles the packets into the original whole.
Each device connected in the network must have its own, unique Internet Protocol-address. There are currently two standards.
IPv4: This is a 32bit addressing scheme in the following syntax: ###.###.###.### (where ### = 1-255). e.g. 131.130.70.8
IPv6: this is a 128 bit addressing scheme expressed in hexadecimal which can accomodate up to 2^128 devices, thus many more than the previous IP-address standard. This is regarded sufficient for the foreseable future.
e.g. 2001:0DB8:AC10:FE01:0000:0000:0000:0000
IP addresses are assigned by the so-called DHCP server and are usually temporary. There are also permanent IP-adresses (useful e.g. for a server).
A domain name is an IP-address expressed in natural language, e.g. univie.ac.at. This is made possible through the so-called Domain Name System (DNS). This service serves as a registry matching IP-Adresses with domain names.
Example: IP-address 131.130.70.8 resolves to domain name "univie.ac.at"
Fast forwarding a bit the Web 1.0 came about in the 1990s, buiding up on the network technology of the Internet. This was the Web as a publication method built on technologies of Hypertext and Hypermedia, resulting in a network of documents. Prime example for the technology that became widely adopted and is used until today is the World Wide Web (www) as one specific service on the Internet.
The www is a high profile example of a hypertext, which is a retrieval system of linked computer based documents that allows a user to click on a region (called an anchor or a hyperlink) to obtain another document called webpage. At a later point multimedia elements such as audio, video, graphics could be embedded into the textual documents, transforming hypertext to hypermedia.
Even though historically it was not the first implementation of a hypertext system, the core technological components of the World Wide Web were introduced by Tim Berners Lee in 1989. This included the HyperText Transfer Protocol (HTTP) 0.9, the HyperText Markup Language (HTML), the first Web browser (named WorldWideWeb, which was also a Web editor), the first HTTP server software (later known as CERN httpd), the first web server (http://info.cern.ch), and the first Web pages that described the project itself.
First webpage ever: http://info.cern.ch/hypertext/WWW/TheProject.html
The Web 1.0 was used more as a publication system with static pages or "read only" for the average user, even though the editing capabilities were originally built in.
The www was widely adopted throughout the 1990s and the technologies developed significantly further over time (see Evolution of the Web).
- HTTP is manages the communication in the WWW between the web client and web server and works as a request-response protocol.
- The browser (client) sends a request to the server (using a specified request method), and the server sends a response to the client containing status information about the request and if possible also the requested content.
- HTTP request methods
- HEAD
- GET
- POST
- PUT
- DELETE
For more info about HTTP have a look at W3Schools.com: What is HTTP?, HTTP Request Methods.
-
A URL is the address used by a Web browser to identify the location of content on the Web.
-
The components of a URL are: protocol, host, port, and path. These are combined in the following syntax:
protocol://host:port/path?query
Web 2.0 is a marketing term coined by the publisher Tim O’Reilly (2005) to describe the then new concepts rather than a set of technologies.
In the mid-2000s a big step occurred with the rise of software for personal and corporate multimedia publishing on the web (blogging software, cloud based media sharing platforms) as well as social networks. These platforms by now have become ubiquitous and commercialized, and are dominated by a few big players, leading to new business models where data about users become commodities – as well as services on top which can interact with them. Also software for special functionalities formerly only available in desktop applications moved on the web using advances in technology, such as AJAX, RSS, XSLT as well as using technological advances in network technology enabling to transfer large data files (including streaming video and audio) virtually without network lags as well as making it possible for consumer to be always online and enabled people to publish, share and produce content. Thus "Web 2.0 is all about harnessing collective intelligence" (O'Reilly & Battelle, 2009, p. 1).
According to O'Reilly the web turned into a platform where (personal) data uploaded by the users into content management systems, which are then networked. Thus we moved from a network of documents to a network of data.
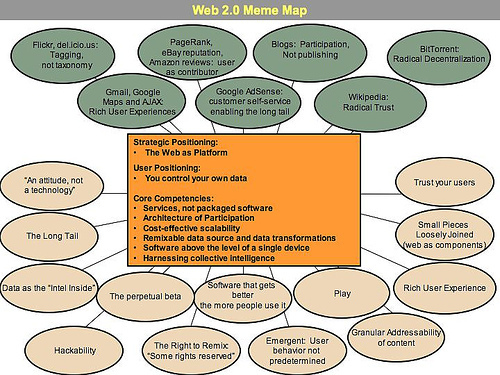
A few years later Tim O'Reilly and John Battelle (2009) evaluated the development of technology since the coining of the term Web 2.0 and named the phenomenon Web squared. "The Web is no longer a collection of static pages of HTML that describe something in the world. Increasingly, the Web is the world—everything and everyone in the world casts an 'information shadow,' an aura of data which, when captured and processed intelligently, offers extraordinary opportunity and mindbending implications"(O'Reilly & Battelle, 2009, p. 2)
For Digital Humanities two directions are of increasing importance: the semantic web and location-based information.
Through the invention of the smartphone in 2007 "[c]ollective intelligence applications are no longer being driven solely by humans typing on keyboards but, increasingly, by sensors. Our phones and cameras are being turned into eyes and ears for applications; motion and location sensors tell where we are, what we’re looking at, and how fast we’re moving. Data is being collected, presented, and acted upon in real time. The scale of participation has increased by orders of magnitude."(O'Reilly & Battelle, 2009, p. 1).
Through machine-learning the computer is aiming to understand the world and the meaning of objects by bridging the so-called "semantic gap" between low-level patterns and semantic information. Humans teach the computer their knowledge about the world and through semantic web-technologies such as RDF and ontologies, semantic information about real world objects and processes is captured and modeled and this information is networked (keyword: Linked Data).
Digital media become location-aware. Services cannot only react to learned preferences but also to the physical situation of the user (see Gordon & Souza e Silva, 2011). Through ubiquitous Internet connection and therewith ubiquitous information together with location tracking of the devices, their users as well as objects, information can be bound or mapped to certain locations (local contextualization) or tracked through space and time.
Thus the Web becomes the world and the world feeds directly into the Web.
The main front-end web technologies include:
- HTML: HyperText Markup Language. HTML provides a set of tags for web documents, with rules for their use. There are several versions of HTML; new projects should use HTML5. We recommend using strict XML syntax.
- CSS: Cascading Style Sheets. CSS provides means to determine the appearance of Web-content beyond the standard styling of the browser. There are several versions of CSS; new projects should use CSS Snapshot 2017 W3C Working Group Note, 31 January 2017.
- JavaScript: JavaScript enables the user to interact with the page in the browser. JavaScript is run on the client-side, thus in the browser on the machine of the user.
You can author HTML, CSS, and JavaScript in Atom.
This technology stack allows e.g. the separation of content and layout. HTML is used to create the content structure of a web-document, CSS ist used to determine the layout and appearance.
HTML is a set of tags (elements) controlled by a schema (rules for which tags are permitted in which contexts). It has elements that form a tree structure.
- Elements can be empty or have other elements inside them or text or both.
- Elements that have content inside them must be closed.
- Elements must be correctly nested.
- Elements can have attributes.
Element example: <div> This is an element </div>
Element hierarchy example: <div> <p> This is an element </p> Some more text </div>
Attribute example: <div style="color:red"> This text will be colored red </div>
All content that will appear in the web page goes inside the <body> element. A typical page has some of the following elements:
- Headers (
<h1>through<h6>) - Paragraphs (
<p>) - Lists (
<ul>for bulleted lists,<ol>for numbered list). The only children allowed for these list are<li>(list item). - Tables (
<table>,<tr>for table rows,<th>table headers,<td>table cells)
You’ll use some of these shortly.
Currently you will see nothing. However, we will create something similar to the following example in Atom:
<!DOCTYPE html>
<html xmlns="http://www.w3.org/1999/xhtml">
    <head>
        <title>HTML exercise 1</title>
    </head>
    <body>
        <h1>HTML exercise 1</h1>
        <h2>This is a level 2 header, or subheading</h2>
        <p>This is a paragraph.</p>
        <p>This is a second paragraph.</p>
        <p>This is another paragraph.</p>
        <h3>List:</h3>
        <ol>
            <li>This is the first item in a list.</li>
            <li>This is the second item in the same list.</li>
            <li>This is the third item in the same list.</li>
        </ol>
        <p>This is one last paragraph.</p>

        <h3>Table:</h3>
        <table>
          <tr>
            <th>Firstname</th>
            <th>Lastname</th>
            <th>Age</th>
          </tr>
          <tr>
            <td>Jill</td>
            <td>Smith</td>
            <td>50</td>
          </tr>
          <tr>
            <td>Eve</td>
            <td>Jackson</td>
            <td>94</td>
          </tr>
        </table>

    </body>
</html><!DOCTYPE html>
<html xmlns="http://www.w3.org/1999/xhtml">
<head>
<title>HTML exercise 1</title>
</head>
<body>
</body>
</html>w3.org namespaces XHTML NS XHTML
- Fork this Repository and use
git cloneto access the files on your local machine. - Start Atom.
- Create a new directory called
html-yournameand a new file calledindex.html. The latter must be saved in thehtml-yournamedir. Exercise example: web_exercise_1.html. - Open
index.htmlin Atom - Start a web browser.
- Open the same file in your browser (
Ctrl+o[Windows] orCmd+o[Mac OS] to open a file from the filesystem). - The only part of the HTML file that is rendered inside the browser window is the part inside the
<body>tags. Notice that we’ve used several of the element types described earlier. - Modify the text of the HTML file in Atom. You might add additional paragraphs (
<p>) elements or headers (<h1>through<h6>). You can change the bulleted list to a numbered one by changing the wrapper from<ul>to<ol>(you need to change both the start and end tag, although if you change the start tag first, Atom will usually change the end tag automatically to match). - Save your document from within Atom and then reload it into the browser, observing the changes.
git add --allgit commit -m "added index.html"git pull origin main- resolve merge conflicts if necessary
git push origin main
- HTML browsers have default styling built in for HTML, which the user can customize or override with CSS.
- CSS is typically defined in a separate file, which is associated with the HTML through a
<link>element in the<head>of the HTML file. Storing the CSS outside the HTML page makes it easy to apply the same CSS to multiple files to achieve a consistent appearance. - CSS instructions consist of a selector (which identifies what type of element will be styled) followed by a set of rules enclosed in curly braces. Each rule consist of a property and a value, separated by a colon, and multiple rules are separated by semicolons. For example
css p {font-weight: bold; color: red;}embolds all<p>elements (since the selector value isp) in the document and colors them (since the property name iscolor) red (since the property value is “red”). Selectors can be fine-tuned to target elements only in specific contexts or with specific attributes; we’ll see a bit of that below.
Create a directory static and sub directory css inside your html-yourname dir.
Create a new file called style.css and save it in the static/css directory you previosly created and open it in Atom. Example CSS: web/web_exercise_2.html.
Before we work with CSS open your index.html file and make the following changes:
<!DOCTYPE html>
<html xmlns="http://www.w3.org/1999/xhtml">
    <head>
        <meta charset="utf-8"/>
        <title>HTML exercise 2</title>
        <link rel="stylesheet" type="text/css" href="static/css/style.css"/>
    </head>
    <body>
        <h1>HTML exercise 2</h1>
        <h2>This is a level 2 header, or subheading</h2>
        <p>This is a paragraph.</p>
        <p>This is another paragraph.</p>
        <h3>List:</h3>
        <ul>
            <li>This is the first item in a list.</li>
            <li>This is the second item in the same list.</li>
        </ul>
        <p>This is one last paragraph.</p>

        <div>
            <h3 class="center">Cool People Table</h3>
             <table class="coolPeople center">
              <tr class="tableTitles center">
                <th>Firstname</th>
                <th>Lastname</th>
                <th>Age</th>
              </tr>
              <tr>
                <td>Can Özgür</td>
                <td>Yilmaz</td>
                <td>26</td>
              </tr>
              <tr>
                <td>Asil</td>
                <td>Cetin</td>
                <td>??</td>
              </tr>
            </table>
        </div>

    </body>
</html>- Notice the difference that this file has added a
<link>element in the<head>, which uses the@hrefattribute to point to the CSS file. - Some elements like
<h3>have attributes calledclassand one or serveral values inside. - Open your
style.cssfile and add the following CSS code in Atom and notice that it implements the commands described above, which are responsible for the color, weight and shape of the paragraphs and the table. Your CSS file should look something like. Example CSS: web/web_exercise_2.css - Reload your
index.htmlin your Web Browser and notice the changes.
p{
    color: purple;
    font-weight: bold;
    background-color: chartreuse;
}

ul{
    font-style: italic;
}

table, th, td{
    border: 1px solid black;
}

.coolPeople{
    font-family: "Helvetica", "Times New Roman", Times, serif;
    border-spacing:0; /* Removes the cell spacing via CSS */
    border-collapse: collapse;  /* Optional - if you don't want to have double border where cells touch */
}

.tableTitles{
    background-color: #77a9ef;
}

div{
    margin: auto;
    width: 50%;
    border: 3px solid green;
    padding: 10px;
}

.center{
    margin: auto;
    width: 50%;
    text-align: center;
}- Add a CSS rule to color list items (
<li>). You can find a list of recognized color names at https://www.w3schools.com/colors/colors_names.asp (and there are also ways to specify colors that don’t have names). - Bolding is set with the
font-weightproperty, but italics are turned on by setting thefont-styleproperty to “italic”. Italicize the<h1>header by creating a new rule withh1as the selector,font-styleas the property name, and “italic” as the property value. - You can set a
background-colorproperty for any element, or for the entire page. Try it! (To specify a property for the entire page, create a CSS rule with a selector for “body”, since the<body>element contains everything on the page.) - Try changing the size of an element with the
font-sizeproperty. Values can be absolute (e.g., “50px” for 50 pixels) or relative (e.g., “small” or “smaller”).
git add --allgit commit -m "added style.css and changed index.html by adding classes"git pull origin main- resolve merge conflicts if necessary
git push origin main
Open this link to read more about: What is GitHub Pages?
- Open Settings of your Github Repository
- Click on Pages
- Select a Source -> change dropdownmenu from None to master or main and root to html-yourname
- Click save
- Requires directories:
.githuband a sub directoryworkflowsin your Github (git) repository - Requires a file called
build.ymlstored in theworkflows.
Copy&Paste the following or download this file: githubActions/build.yml
name: Build and publish

on:
  push:

jobs:
  build_pages:
    name: Publish as GitHub Pages Website
    runs-on: ubuntu-latest
    steps:
    - name: Perform Checkout
      uses: actions/checkout@v2
    - name: Deploy GH Pages
      uses: peaceiris/actions-gh-pages@v3
      with:
        github_token: ${{secrets.GITHUB_TOKEN}}
publish_dir: ./htmlgit add --allgit commit -m "added GitHub Actions workflow"git pull origin main- resolve merge conflicts if necessary
git push origin main
See Actions work!
Select the correct Source by changing the Branch to "gh-pages" and click save.
- JavaScript can be used to animate a page, so that it responds to user actions, such as clicking on or mousing over some text.
Open your index.html file in Atom. Exercise example: web/web_exercise_3.html
It should look something like:
<!DOCTYPE html>
<html xmlns="http://www.w3.org/1999/xhtml">
    <head>
        <meta charset="utf-8"/>
        <title>HTML exercise 3</title>
        <link rel="stylesheet" type="text/css" href="static/css/style.css" />
        <script type="text/javascript" src="static/js/toggleColor.js">/**/</script>
    </head>
    <body>
        <h1>HTML exercise 3</h1>
        <h2>This is a level 2 header, or subheading</h2>
        <button type="button" value="red" id="redButton">Red</button>
        <button type="button" value="green" id="greenButton">Green</button>
        <button type="reset" value="black" id="blueButton">Reset</button>
        <p>This is a paragraph.</p>
        <p>This is another paragraph.</p>
        <ul>
            <li>This is the first item in a list.</li>
            <li>This is the second item in the same list.</li>
        </ul>
        <p>This is one last paragraph.</p>

        <div>
            <h3 class="center">Cool People Table</h3>
             <table class="coolPeople center">
              <tr class="tableTitles center">
                <th>Firstname</th>
                <th>Lastname</th>
                <th>Age</th>
              </tr>
              <tr>
                <td>Can Özgür</td>
                <td>Yilmaz</td>
                <td>26</td>
              </tr>
              <tr>
                <td>Asil</td>
                <td>Cetin</td>
                <td>??</td>
              </tr>
            </table>
        </div>
    </body>
</html>
- Notice that except for the filename and title, there are only two differences between this file and the last one. The first difference is that this file has added a
<script>element in the<head>, which uses the@srcattribute to point to the separate JavaScript file. The second is that we’ve created two<button>elements. The@valueof the button is the text that it displays. As we’ll see below, the@idvalues let the CSS select the buttons separately, so that it can color them differently. - Open the HTML file in a browser. Notice that the page looks the same as the one in the CSS exercise, except for the addition of the buttons.
Open your style.css file in Atom. Exercise example: web/web_exercise_3.css.
It should look something like:
p{
    color: red;
    font-weight: bold;
}
#redButton{
    background-color: pink;
}
#greenButton{
    background-color: lightgreen;
}
#blueButton{
    background-color: lightblue;
}

table, th, td{
    border: 1px solid black;
}

.coolPeople{
    font-family: "Helvetica", "Times New Roman", Times, serif;
    border-spacing:0; /* Removes the cell spacing via CSS */
    border-collapse: collapse;  /* Optional - if you don't want to have double border where cells touch */
}

.tableTitles{
    background-color: #77a9ef;
}

div{
    margin: auto;
    width: 50%;
    border: 3px solid green;
    padding: 10px;
}

.center{
    margin: auto;
    width: 50%;
    text-align: center;
}- A CSS selector that begins with a hash mark matches the element in the document that has the text after the hash mark as an
@idvalue. We use that feature to color the buttons differently. - CSS supports “red” and “green” as colors, but it’s difficult to read black text against them because they’re dark, so we’ve chosen lighter alternatives. Change the background colors to “red” and “green”, reload the page in the browser, and notice the difference. We could, alternatively, have kept real red and green as backgrounds and changed the value of the
colorproperty (which controls the color of the foreground text) from the default “black” to something easier to read against a dark background.
Click the red or green buttons in the web browser and see how the color of the paragraphs changes.
Create a new directory as sub directory of html/static called js.
Create a new file called toggleColor.js, save it in the html/static/js directory and open it in Atom. Exercise example: web/web_exercise_3.js.
Copy&Paste the following JavaScript code into your toggleColor.js file:
window.addEventListener('DOMContentLoaded', initialize, false);

function initialize() {
    var buttons = document.getElementsByTagName('button');
    for (var i = 0, length = buttons.length; i < length; i++) {
        buttons[i].addEventListener('click', toggleColor, false);
    }
}
function toggleColor() {
    var paragraphs = document.getElementsByTagName('p');
    for (var i = 0, length = paragraphs.length; i < length; i++) {
        paragraphs[i].style.color = this.value;
    }

    var tables = document.getElementsByTagName('table');
    for (var i = 0, length = tables.length; i < length; i++) {
        tables[i].style.color = this.value;
    }
}
This JavaScript has three parts: a bootstrap line that gets it started (just linking to it isn’t enough; we also have to tell it to run), an initialization function that we’ve called initialize(), and a toggleColor() function that will change the color of the paragraphs when the user clicks a button.
The first line tells the browser to run the initialize() function (lines 2 through 7) when the page finishes loading. This fires only once.
The initialize() function fires automatically, thanks to the bootstrap line, as soon as the page has finished loading. It finds all of the <button> elements (there are two of them), loops over them, and tells them both to listen for click events, that is, to do something when they are clicked. The something they are told to do is to fire the toggleColor() function. The initialize() function also fires only once.
The toggleColor() function fires whenever the user clicks a button because in the initialize() function we told the buttons to listen for and respond to clicks. When toggleColor() fires, it finds all of the paragraphs and tables (only one in this case), loops over them, and changes their color. The button that was clicked is represented in the function by the magic word this, and the expression this.value returns the value of the @value attribute on the <button> element that was clicked. Since those values are “red” and “green”, we can use them directly to set the color style property of the paragraphs.
git add --allgit commit -m "added javascript files"git pull origin main- resolve merge conflicts if necessary
git push origin main
This use of JavaScript to modify the CSS of a page that has already loaded is sometimes called DHTML (dynamic HTML). When the browser first loads and renders the HTML, it converts the character-by-character file into a tree in memory (HTML, like XML, is a tree), and what it renders in the browser window is the tree, decorated with CSS. Our JavaScript routine works by rewriting the tree in memory; the original HTML and CSS files don’t change, but the in-memory tree does.
You can see this in action by opening your browser developer view as follows:
- In Chrome:
Cmd+Opt+j(Mac) orCtrl+Shift+j(Windows) - In Firefox:
Cmd+Opt+k(Mac) orCtrl+Shift+k(Windows) - In Safari: If you haven’t done so already, you need to enable the developer tools with Preferences → Advanced → Show Develop menu in menu bar. You can then open the developer view with
Cmd+Opt+i.
We’ll explain the next steps in Chrome, but they have equivalents in the other browsers:
- In the debugger area, click on the label “Elements”. This will show the HTML of the page you are viewing. This isn’t the literal HTML from the page you loaded; it has been recreated by serializing the in-memory DOM tree.
- Reload the page with
Cmd+r(Mac) orCtrl+r(Windows) to erase any lingering effects from having clicked previously on buttons. - Look at one of the
<p>elements in the debugger panel and click on one of the buttons. You’ll see the in-memory DOM tree change to add the CSS styling directly to the<p>elements.
When you’re developing JavaScript and don’t get what you expect, you can use the developer interface to examine what’s happening under the hood.
- Mozilla Developer Network HTML
- Mozilla Developer Network CSS
- Mozilla Developer Network JavaScript
You should ensure that your HTML and CSS are valid, that is, that they conform to the requirements of the standard. It isn’t enough to verify that they look correct in the browser, since if they aren’t valid, they may not look correct in a different browser (including your own when the next upgrade is released).
You can validate your files online:
- For HTML: W3C Markup validation service
- For CSS: W3C CSS validation service
The basic architecture of the 'Internet' is the server-client model. In this model, there is a centralized server which serves content to clients. When you open a web browser and navigate to a website you become a client. You (your browser) sends requests to server and server sends responses back. The code that runs on the web browser (what we learned today) is considered front-end and the code that runs on the servers is considered backend.
##W3 Tutorials
HTML: https://www.w3schools.com/html/