#Automatically Create vEOS nodes using Packer
##Introduction The guides below will help you quickly turn up vEOS nodes running on VMware (FusionPro/Workstation) or VirtualBox. The Packer configuration files (.json) define 4 VM nodes and assign specific virtual networks to switch interfaces to simulate isolated connections. You can setup a quick demo by using packer-veos and packer-ztpserver. Both of these installations use the ztpserver-demo files to create a simple test environment.
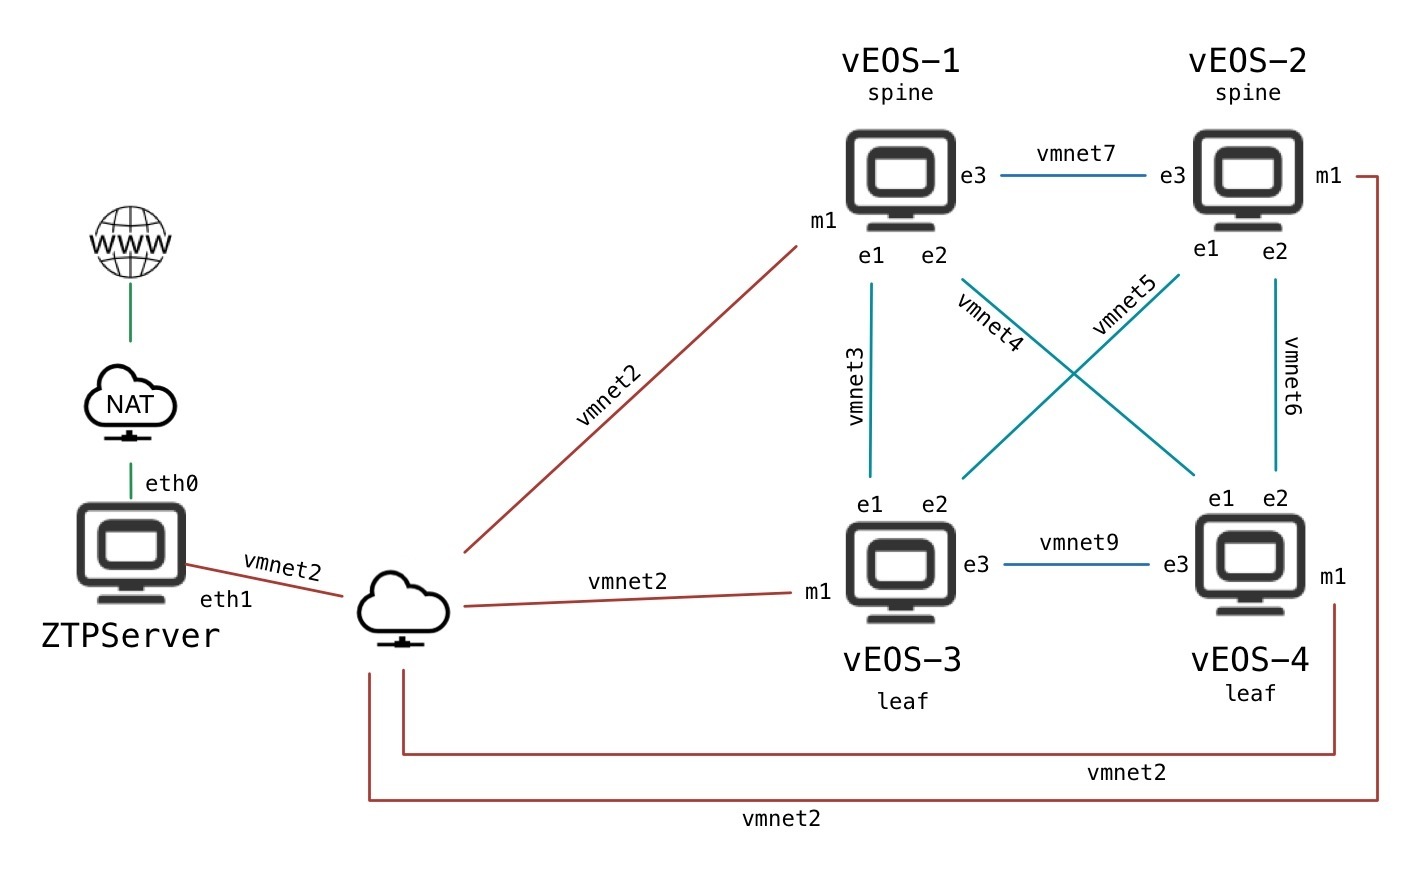
###VMware Virtual Network Setup
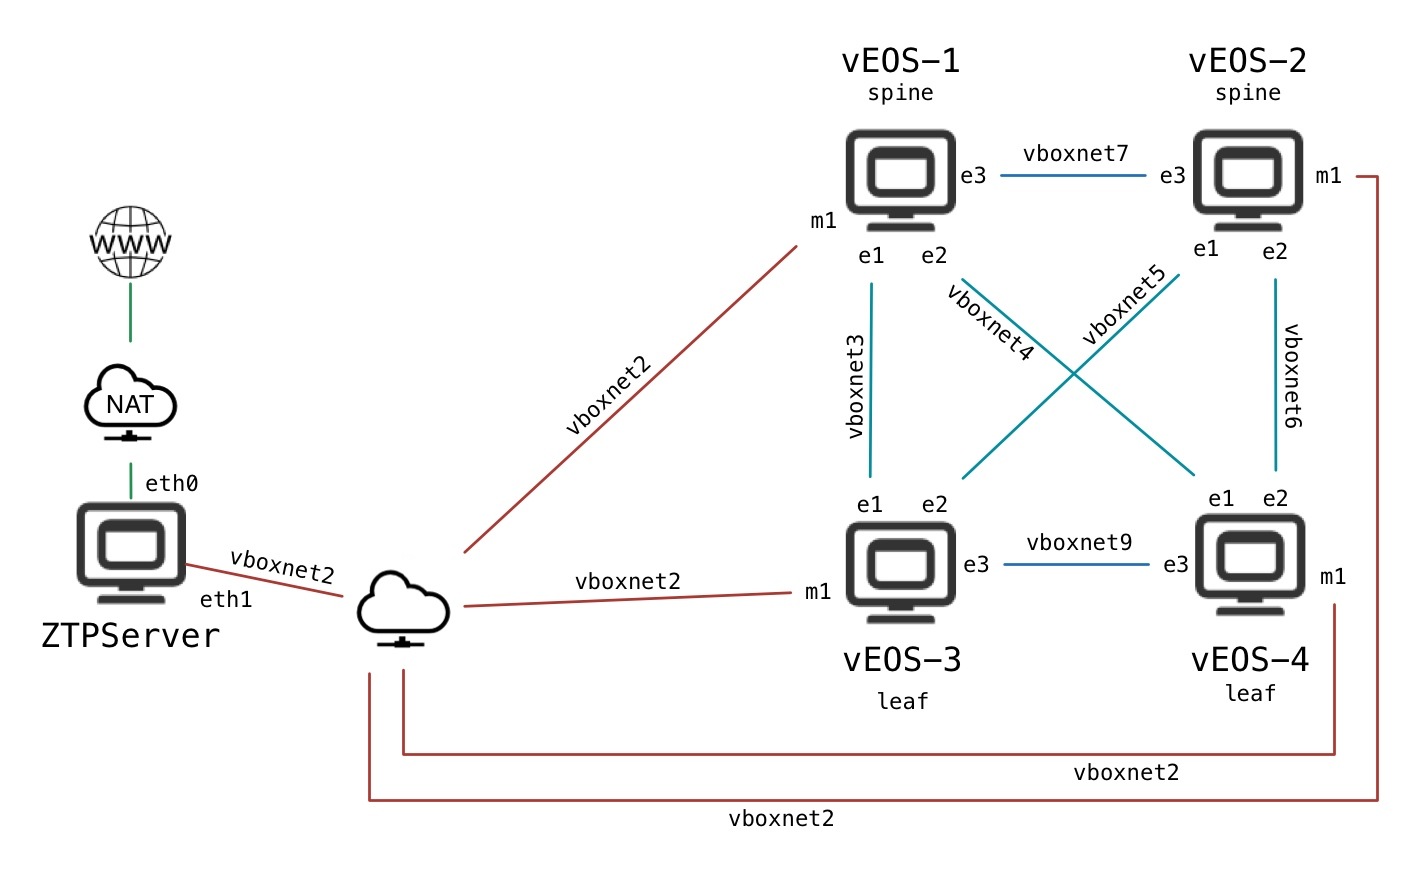
###VirtualBox Virtual Network Setup
###Memory Requirements Each vEOS node requires at least 2G of RAM and so does the ZTPServer VM. While the memory for the ZTPServer could be reduced without impacting the performance much (500M RAM should also work just fine), the memory requirements for vEOS are not as flexible (1.5G per VM might work with some older vEOS instances, but it is NOT recommended to go lower than that). Hence, in order to run this demo it is recommended to use a machine which has at least 16G or RAM. If that is not possible, the demo can still be used, but the VMs should not all be started at the same time (the maximum number of VMs which could run in parallel will depend on memory size of the system, given the constraints from above).
###What's Supported
- Host Operating Systems
- Windows
- Mac Osx
- Host Hypervisors
- VirtualBox
- VMware Fusion (Professional Required)
- VMware Workstation
###Prerequisites
- You will need to log into your Arista.com account to obtain the following files from https://www.arista.com/en/support/software-download:
- Aboot-[release].iso and rename it Aboot-vEOS.iso
- vEOS-lab-[release].vmdk and rename it vEOS.vmdk
- Python (this has been tested on Python 2.7.x)
- Git (technically optional but makes life easier)
- User running script has sudo privileges (NIX-based)
NOTE: You can use any Aboot and vEOS release combination you want, but make sure that the two are compatible. If you are not sure the two files you intend to use are compatible, please contact [email protected].
##Getting Started The create-veos.py helps you create a small spine/leaf topology that you can use to test ZTPServer.
Step 1. Retrieve the packer-veos configuration files here or use:
git clone https://github.com/arista-eosplus/packer-veos.git
cd packer-veos
Step 2. Place vEOS.vmdk and Aboot-vEOS.iso into the correct directories. Your directory should look like:
    packer-veos
        /vmware
            - vEOS.json
            /source
                - vEOS.vmx
                - vEOS.vmdk
                - Aboot-vEOS.iso
        /virtualbox
                - vEOS.json
                - vEOS-windows.json
            /source
                - vEOS.ovf
                - vEOS.vmdk
                - Aboot-vEOS.iso
Step 3. Begin the build with the arguments of your choice
arista:packer-veos arista$ ./create-veos.py --help
usage: create-veos.py [-h] -H {vmware,virtualbox}
[-n {vEOS1,vEOS2,vEOS3,vEOS4} [{vEOS1,vEOS2,vEOS3,vEOS4} ...]]
[-b BOOTTIME] [-N VMNAME]

Automatically install the vEOS Demo Nodes

optional arguments:
-h, --help            show this help message and exit

-H {vmware,virtualbox}, --hypervisor {vmware,virtualbox} Hypervisor to create VM in

-n {vEOS1,vEOS2,vEOS3,vEOS4} [{vEOS1,vEOS2,vEOS3,vEOS4} ...], --nodes {vEOS1,vEOS2,vEOS3,vEOS4} [{vEOS1,vEOS2,vEOS3,vEOS4} ...]
Space-separated list of nodes to build OR omit option to build all
E.G. -n vEOS1 vEOS3 vEOS4

-b BOOTTIME, --boottime BOOTTIME This is the time Packer will wait before it sends commands over VNC

-N VMNAME, --vmname VMNAME The Virtual Machine name prefix
To build all of the vEOS nodes with VirtualBox:
arista:packer-veos arista$ ./create-veos.py -H virtualbox
To build all of the vEOS nodes with VMware:
arista:packer-veos arista$ ./create-veos.py -H vmware
To build specific nodes with VirtualBox:
arista:packer-veos arista$ ./create-veos.py -H virtualbox -n vEOS1 vEOS3
To build specific nodes with VirtualBox and lower the boot wait time:
arista:packer-veos arista$ ./create-veos.py -H virtualbox -n vEOS1 vEOS3 -b 1m30s
To build specific nodes with VirtualBox and define the VM name prefix:
arista:packer-veos arista$ ./create-veos.py -H virtualbox -n vEOS1 vEOS3 -N testName
###Post-Installation Tips
####Set the PATH Variable
If Packer is installed via the script above, the packer binary path wasn't permanently
added to your system PATH variable. If you intend on using Packer again, you might consider
updating your PATH variable.
NIX-Based Terminal
echo "export PATH=$PATH:~/packer-bin" >> ~/.bash_profile
and then restart your bash.
Windows-Based Command Prompt
setx PATH "%PATH%;%USERPROFILE%\packer-bin"
and then restart your cmd.exe.